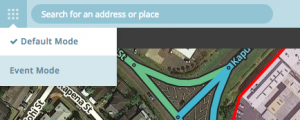
The basic WME environment used for most tasks is called the Default Mode. A second option is Events Mode, enabling the map editor to designate a Major Traffic Event (MTE) to be set on the map so Wazers can be routed correctly.
MTEs are large-scale events that have associated road closures:. These include sport events such as marathons and triathlons, festivals, parades, significant construction works and VIP visits. Reporting MTEs alerts your local community to closures and congestion they may encounter on their route due to events nearby.
If a road closure is part of a larger event, that event can now be added to WME through the Events tool.
The current version of the tool allows only creation of the events. Currently, the closures themselves must be uploaded by returning to Default Mode and using the real-time closure tool; the created MTE will appear as an option in the closure panel.
Future phases will allow the closures to be entered while in Event Mode, a website to be created and push notification to be set automatically for the day of the event. At present, if editors have entered the event but want a push notification to go out, they must submit it for consideration by emailing waze-closures@google.com with a permalink to the area and the event name.
Important: Segment closures must be set in WME 48 hours before the event for a push notification to be sent.

Creating an event
1. In WME, navigate to the city of the event.
2. Click the mode selection button next to the search bar.
3. Select “Event Mode," and then search in the left pane to see if the event has been set.

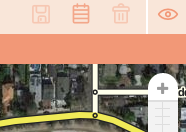
4. If not, click the calendar icon in the top bar tocreate a new event.
5. In the left pane, add the event name in English;there is a link to add a non-English name as an alternate. The name should be as short as possible while accurately representing the event.
6. Fill in the event details, including the event website. The event dates/times do not have to be when the earliest related closures start. The Tweet Text field is for a later update of the tool, so it can be left blank.
7. Leave the Submit button for later — after the segment closures are entered.
8. Click the save icon in the top bar.
Creating event closures
Editors must be in Default Mode to add closures to an event. The closure can be associated with the event in the closures tool, although there can be a delay after creating the event before it appears in the drop-down menu. In future updates, adding closures directly to the event in Event Mode will be possible..
1. Create closures normally, through the Closures tab of the segment editing pane. Select the event name in the Event drop-down menu.
2. Save the closures. They will now be visible on the closures tab of the event in the event editor.
3. Once the closures are attached to the event, go back to the event in event mode, click the Submit button and save.
After the event is submitted, the Waze closures team will review the event and decide whether to send a push message for it. Once development of this tool is complete, the editing community will have all permissions to fully manage the process.