Kentsmith9 (talk | contribs) |
Kentsmith9 (talk | contribs) m (→Additional Details: fixed forum link) |
||
| Line 77: | Line 77: | ||
Using the WME, you can add, edit, or delete nearly any object within your [[#Editable_Area|editable area]]. If a road segment is '''locked''' by a user with a higher editing rank than you, the road, intersection, or turn permissions connected to that road segment cannot be altered unless you chose one of the following: | Using the WME, you can add, edit, or delete nearly any object within your [[#Editable_Area|editable area]]. If a road segment is '''locked''' by a user with a higher editing rank than you, the road, intersection, or turn permissions connected to that road segment cannot be altered unless you chose one of the following: | ||
*Place a request to the [ | *Place a request to the [https://www.waze.com/forum/viewforum.php?f=622 Update/Unlock Request forums] to unlock that segment by giving them a [[Waze Map Editor#Permalink|permalink]] with the segment or segments highlighted and a country manager may unlock it for you. | ||
*Send a Private Message (PM) to the previous editor using the [http://www.waze.com/forum/ucp.php?i=pm&folder=inbox Forum PM functionality]. As of the August 12, 2012 update, Area Managers are no longer able to override segments locked by higher-rank editors. | *Send a Private Message (PM) to the previous editor using the [http://www.waze.com/forum/ucp.php?i=pm&folder=inbox Forum PM functionality]. As of the August 12, 2012 update, Area Managers are no longer able to override segments locked by higher-rank editors. | ||
<br/>Be sure to check out the [[Map Editing Tips and Hints]] page for some shortcuts for logging in to the map editor and other great pieces of information to enhance your map editing. | <br/>Be sure to check out the [[Map Editing Tips and Hints]] page for some shortcuts for logging in to the map editor and other great pieces of information to enhance your map editing. | ||
== Practice Mode == | == Practice Mode == | ||
Revision as of 05:15, 3 May 2017
| New editors, please first visit our WME Welcome page. |
This page is the key starting point for any editor of the Waze maps. Ensure that you read through the entire page to best prepare you for the many bits of information needed to make you a good map editor. People who edit the map without fully understanding many of these elements can do more harm than good with their edits. If you cannot find an answer to your question somewhere in the Wiki, be sure to post a question in the Waze Forums where many experienced Wazers will be happy to provide an answer. Just be sure you did your best to search for the answer in the Wiki here.
The Road Maps History
The Waze map was started in many countries by importing publicly available road data. This data was fairly accurate in geometry, but could be out of date. It also did not include some details vital for a navigation system such as permitted travel direction, and distinctions between drivable roads and non-drivable ways, such as railroads and canals. The imported maps also did not indicate if a junction or bridge was present where roads crossed. Waze defaulted to a junction in all cases, and even though turn restrictions may show as being in place at these junctions, all turns are actually allowed if the segments have never been edited. This set of data was enough to get started, but definitely needed updating and maintenance.
This is where two key aspects of the Waze system come into play:
- The web-based map editing tools for Waze users to edit maps of their neighborhoods, cities or other places with which they are familiar.
- The collecting of GPS data from Waze users to modify the maps to set road direction and turning permissions at intersections.
Some countries had no data available for their road systems, so the maps for these countries must be built from the ground up by Waze users. The maps are created in the web editor using roads recorded in the Waze client and the stored GPS tracks of all Waze users superimposed over available aerial photography.
The Map Editor
Waze is currently using its second generation map editing interface (covered in this article). Known as the Waze Map Editor (or WME for short), it is the default editor for Waze since September 19, 2011. This editor interface was functionally upgraded on November 2, 2014 which added UI changes to Place Update moderation, ability to jump to another nearby Place Update Request to quickly moderate multiple requests in proximity to each other, additional saving error meaningful messages, and removal of the ability to use the Service Road type. There are currently three different server farms managing the maps of the world. Be sure to select the appropriate server when making edits to a particular part of the world. You can use the same username on all servers, but your editing points are managed separately by each server. Also the maps are not synchronized between the servers, so for example if you went to the North America server to modify parts of Europe, the different server supporting Wazers in Europe would not see your changes.
Map Editing Quick-start Guide
Learning the best map editing techniques for proper navigation and appearance takes some time and practice, but it can be a fun and rewarding experience too. You can be proud that you are improving the experience for all Waze users. The details in later sections of this page are important for you to learn, but for simple edits, there is a Map Editing Quick-start Guide to get you going quickly.
It is very important that all editors take time to read all the documentation found in the editing manual to ensure the Waze map remains complete, accurate, and able to fully and properly route users.
Accessing the Waze Map Editor (WME)
Basics
The Waze Map Editor is currently officially supported on the Chrome browser only. It may or may not work on other browsers, but there is currently no official support for issues that might arise.
You can access the map editing page directly using a single URL: http://www.waze.com/editor. Use the menu at the top-right corner of the screen to select between US & Canada, Israel, and World server infrastructures.
If you are at the Waze homepage:
- From the Waze homepage select the Login link at the top-right corner of the screen.
- Click on "Live Map" in the main navigation header.
- Click on "EDIT THE MAP"
When have you successfully arrived at the Waze Map Editor, you are presented with a large splash screen full of information, possible actions, and a place to enter your Waze username and password.
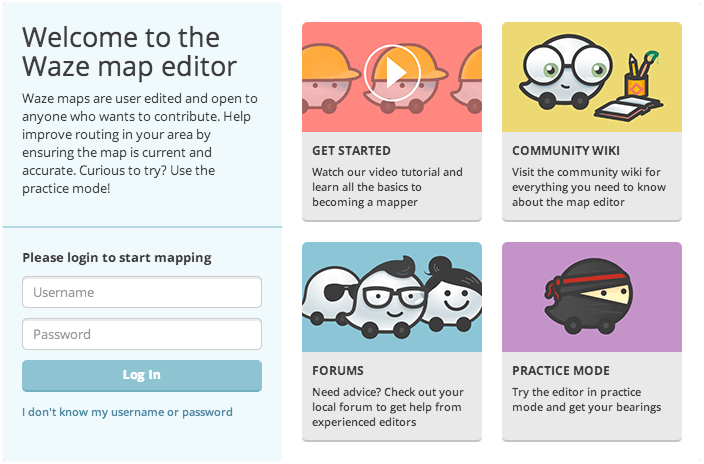
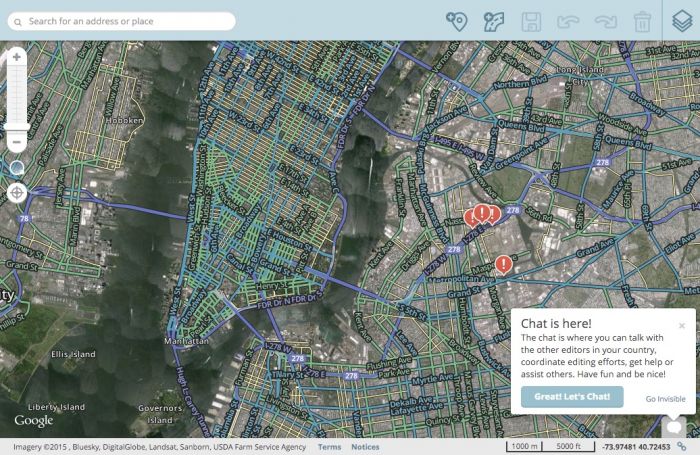
Once logged in, your screen should look something like this:
Best Map Editing Practices
When editing the Waze maps, please be sure to first review this page and also follow the Best map editing practice.
Additional Details
Using the WME, you can add, edit, or delete nearly any object within your editable area. If a road segment is locked by a user with a higher editing rank than you, the road, intersection, or turn permissions connected to that road segment cannot be altered unless you chose one of the following:
- Place a request to the Update/Unlock Request forums to unlock that segment by giving them a permalink with the segment or segments highlighted and a country manager may unlock it for you.
- Send a Private Message (PM) to the previous editor using the Forum PM functionality. As of the August 12, 2012 update, Area Managers are no longer able to override segments locked by higher-rank editors.
Be sure to check out the Map Editing Tips and Hints page for some shortcuts for logging in to the map editor and other great pieces of information to enhance your map editing.
Practice Mode
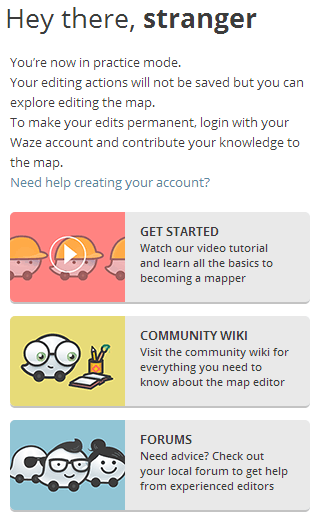
The Waze Map Editor has a Practice mode in which you can perform nearly every action available when logged into the Editor, except that you cannot save any changes. In order to save changes, you must log in. Practice mode is helpful to and should be used by users who are new to map editing in Waze. The editor, while in Practice mode, has icons/buttons and links on the left sidebar area shown here to the left.
There is a significant amount of information organized in the wiki. In fact, nearly every question about Waze has already been asked, and is in the wiki. That's why it's been created: to answer your questions.
If you are a new editor, take time to read the editing manual and use the editor in Practice mode, practicing the functions you would if you were logged in, but without the worry of permanently messing something up.
Here's some things to test out in Practice Mode:
- Add, delete, update segments.
- Rename a segment, change its direction, road type.
- Connect segments to other segments
- Try changing turn restrictions. Restrict all turns on a junction. See how changing a segment direction affects turn arrows.
- Build a roundabout
- Add a park landmark
- Build an overpass
- Delete extra junctions
- Add an alternate name to a segment
When you are ready to log in and try it for real, use the Log in link found on the bottom Practice Mode bar:

Editable Area
In play mode (not logged in), all areas of the map are editable, though you can't save them. Once you have practiced all the functionality, go ahead and log in and try it for real.
In real edit mode (logged in), you can make changes within your editable area. Your editable area consists of:
- The roads you have driven recently (see note below).
- Areas within a certain distance of those roads. How far this distance extends depends on your editing rank.
- Areas in which you are the Area Manager. You can edit your assigned area, even if you have not driven a road nearby recently.
You can highlight your editable area on the map by turning on the layer for editable area.
An object is editable if any portion of it is inside one of your editable areas, subject to any further restrictions covered in the editing restrictions page.
Recent drives
Waze records your drives when it is operating with or without navigating to a destination while your device has constant GPS and GSM/3G/4G network connectivity. You can see a history of those drives in the editor. Make sure you have nothing selected, and click the Drives tab in the side panel.
Short drives are usually added to the drives list almost immediately. Longer drives may take a day or two to appear.
After a certain period of time, these drives expire. They may still show in your drives list, but Waze will no longer display the drive details, unless there is a more recent drive. This timing may not coincide directly with the expiration of your editable area, noted below.
You can tell the difference between recent drives and expired drives in the Drives panel. Recent drives are a clickable link which will show the path of the drive. Expired drives show the summary (date, elapsed time, length), but you can't click them.
Expiration
Editable area gained by a drive expires 90 days after the date of the drive or on the last day of the third month after the drive, whichever is later. An area manager appointment could also be revoked after 90 days of inactivity.
Map Editing Basics
The Waze Map Editor editor was designed to be used without much documentation, but this list will give the quick basics for drawing a new road, roundabout, or landmark
- Click the item you want to create under the drawing button
 Roads
Roads
- For a road, click to start drawing, click to add a geometry Node as you follow a path, and double-click (or shift-click) to end drawing
- For a roundabout, click at the center of the roundabout and move the mouse to size it. Click to create it. Note there must be roads leading into the roundabout first.
 Places
- For a point place (formerly known as a point of interest), click the correct location to create the point.
- For an area place (formerly known as a landmark), click to start the landmark and click as you follow the outline of the area. Double-click to end drawing.
- For each object, there are details you need to enter before saving, such as the city, street name, direction and level, or landmark type for landmarks.
- Click the Save button
You can also modify or delete existing map objects. You do this by selecting an object, then modifying its geometry, location or properties. What is possible with each object depends on the type of object. The Editing manual is where you will find all the details necessary to understand all the editor functionality.
Permalink
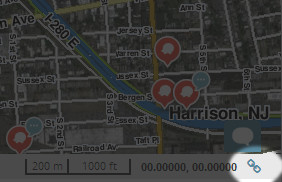
The permalink icon is used to create a Permalink to share and communicate with other editors. A permalink is a URL used to take you or someone else directly to a specific map location. It contains latitude, longitude, zoom level, visible layers, and any objects that are selected. Objects that can be selected may include a junction, a place, or one or more segments.

Before using the permalink button, zoom and pan the map to show what you want to show. If you wish to, select one place, one junction, or one or more segments. To include a single place, junction, or segment in the permalink, click on it before using the permalink icon. To include several segments, use ctrl+click (MAC: ⌘ Command+click).To generate a permalink, click the ![]() permalink button on the top right part of the Map Display Area.
permalink button on the top right part of the Map Display Area.
The first text box in the pop up contains the permalink to the visible area and the item(s) you have selected. By default, the permalink will also include your layers settings. It is best practice to uncheck the Include layers settings box when sharing a link with other editors. Click on the copy icon at the end of the textbox to copy the permalink to the clipboard.
The second text box contains the current latitude and longitude for the center of the visible map. Click on the copy icon at the end of the textbox to copy the coordinates to the clipboard.
To quickly share your permalink on the Waze forum, click the Open sharing options link. Select which forum you would like to post to and click share. A new page will open for you to compose your forum post explaining your request.
Tip: You can change the display name of a link in the forums by using the following format:
- [url=URL LINK]YOUR TEXT HERE[/url]
Settings
| This section is being updated with new settings information. To see the latest proposed draft, go to this forum. |
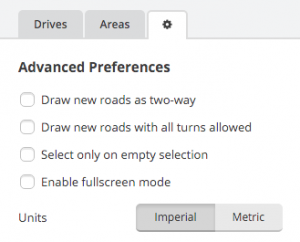
This feature is new as of January 2015[update]
To access user-preference settings in WME, click the "Settings" tab in the left pane. Options include:
- Draw new roads as two-way - determines whether any new road segments you draw start as two-way or one-way
- Draw new roads with all turns allowed - when new roads are drawn with a connection to a junction, the junction can have all "turns" to or from the new segment allowed or disallowed
- Select only on empty selection - affects editor behavior when you select an object (road segment, junction, or place) when there is already an object(s) selected
- If not checked, then clicking on an object will automatically deselect any other objects already selected. This may cause accidental deselection
- If checked, you are prevented from selecting a new object if there is anything already selected. Note that multi-select mode allows you to select additional segments when segment(s) are already selected; use the control key for momentary multi-select, or press the M keyboard shortcut to toggle multi-select mode on/off. Also note that clicking an empty spot can still cause deselection.
- Enable fullscreen mode - when checked, more screen space is given to the map (removes the menu header from the top of the page). Keyboard shortcut ⇧ Shift+F toggles this setting.
- Units - Choose between Imperial (feet/miles) or Metric (meters/kilometers)
Keyboard Shortcuts
When using Waze Map Editor, there are a number of keyboard shortcuts available to make editing the map a bit easier if you prefer the keyboard over the mouse. Below are the default keyboard shortcuts. You can customize some keyboard shortcuts by bringing up the keyboard shortcuts help window (with the ? key), select a shortcut, and then press the single key you want to use instead of the default key. This affects the current browser and computer only. This shortcut information is not stored on the server, so you would have to repeat this for each computer and browser you use.
| Shortcut | Description | |||
|---|---|---|---|---|
| General | ||||
| F | move the cursor to the search box | |||
| ? ⇧ Shift+/ ⇧ Shift+- ⇧ Shift+~ ⇧ Shift+ù |
shows the keyboard shortcuts | |||
| Ctrl+S ⌘ Cmd+S |
save edits | |||
| Delete | delete the single selected object (segment, junction, landmark). To delete multiple objects, you must click the trash can icon and confirm the multiple delete. | |||
| Esc | deselect all objects | |||
| Alt+⇧ Shift+R ⌥ Opt+⇧ Shift+R |
reload all layers (refreshes map without using a permalink; preserves the chat window) | |||
| Drawing | ||||
| I | draw (insert) a new Road/Segment (equivalent to clicking Road under the draw road icon) | |||
| O | draw a new Roundabout (equivalent to clicking Roundabout under the draw road icon) | |||
| Editing Segments | ||||
| D | delete a geometry node from a road segment while hovering the cursor over it during road geometry editing | |||
| E | when one or more segments are selected, activates Edit mode (shortcut for clicking the Edit button) | |||
| H | when a segment is selected, activates House Number mode (shortcut for clicking the Edit House Numbers button) | |||
| M | toggle multi-select mode. Default behavior is that to select multiple segments, you must use the modifier key to multi-select. When toggled active, multi-select mode lets you select multiple segments without using the modifier key. | |||
| R | toggle segment direction between 1-way (A->B), 1-way (B->A), and 2-way while updating road details. See road direction for more information. | |||
| T | when one or more segments are selected, activates Restrictions mode (shortcut for clicking the Add/Edit Restrictions button) - mnemonic Time-restrict | |||
| Ctrl+A ⌘ Cmd+A |
select Entire Street - mnemonic Select All | |||
| Alt+Click | select segments between two segments | |||
| Ctrl+⇧ Shift+click ⌘ Command+⇧ Shift+click |
drag select all objects in a box | |||
| Ctrl+Z ⌘ Cmd+Z |
undo | |||
| Ctrl+⇧ Shift+Y ⌘ Cmd+⇧ Shift+Y |
redo | |||
| Ctrl+⇧ Shift+Z ⌘ Cmd+⇧ Shift+Z |
redo | |||
| Ctrl+↑ ⌘ Cmd+↑ |
increase elevation of selected segments (if all elevations are the same) | |||
| Ctrl+↓ ⌘ Cmd+↓ |
decrease elevation of selected segments (if all elevations are the same) | |||
| Junctions and arrows | ||||
| A |
| |||
| Q | disable all connections for the selected junction which makes the turn arrows all red for that selected junction. | |||
| S |
| |||
| W | allow all connections for the selected junction which makes the turn arrows all green for that selected junction. Note that this key will only enable all turns that had not previously been automatically enabled by the Waze routing server, called soft allowed turns. The soft allowed turns have a higher penalty than turns enabled by the editor. Therefore since soft and editor allowed turns have the same color green, if it is known that all turns are enabled at a particular intersection, it is better to first force all turns to disabled with the Q key and then press the W key to force them all to editor enabled. | |||
| ⇧ Shift+Z |
| |||
| Display and layers | ||||
| ⇧ Shift+A | toggles Area Managers layer | |||
| ⇧ Shift+C | toggles Cities layer | |||
| ⇧ Shift+D | toggles No Name segment highlighting | |||
| ⇧ Shift+E | toggles Editable areas layer | |||
| ⇧ Shift+F | toggles Full Screen mode | |||
| ⇧ Shift+G | toggles GPS points layer | |||
| ⇧ Shift+I | toggles Satellite Imagery layer | |||
| ⇧ Shift+L | toggles Landmarks layer | |||
| ⇧ Shift+V | toggles Live users layer | |||
| ⇧ Shift+P | toggles (map) Problems layer | |||
| ⇧ Shift+R | toggles Roads layer | |||
| ⇧ Shift+S | toggles (speed) Cameras layer | |||
| ⇧ Shift+U | toggles Update requests layer | |||
| Alt+C | toggles Chat window | |||
| Alt+⇧ Shift+R | reloads layers | |||
| ⇧ Shift+↑ | zooms the map in one level | |||
| ⇧ Shift+↓ | zooms the map out one level | |||
| ↑↓←→ | pan the map in all four directions | |||
| ⇧ Shift +click double-click |
re-centers the map on at the clicked location and zooms in one level | |||
| ⇧ Shift +click + drag mouse | draws a temporary rectangle and zooms into that portion of the map | |||
Red ⌘ Cmd keys are for Apple Mac systems
Map Update Timing
Edits made in the online editors do not appear on the Live Map nor client immediately. The Waze servers typically update the client and Live Map every 24 hours, but at times delays could cause this to be multiple days between updates.
Please see the Timeline of updating process page for more detail on the various processes Waze runs and the expected update timing.
Editing Manual
See the Editing manual page.
Style Guides
The Style Guides are important for understanding the nuances of road network design in Waze. Please take time to read, and reference them in the future when you come upon a tricky intersection.
Using External sources (such as Google Imagery)
Usage of any external copyrighted source of information, in order to add information to the Waze database or maps, is not allowed. External copyright information includes any online or printed map information that is not provided by Waze through the Waze Map Editor interface.
With the recent acquisition of Waze by Google, Inc., changes have been made to the Waze Map Editor to include updated aerial and street view images from Google. These are considered internal sources and completely acceptable to be used in creating map information for Waze. Google's terms of use restricts use of their map information to specific conditions and Waze has the proper licensing to use what you see inside the Waze Map Editor, but nothing else.
Using any source of external copyright information puts the Waze maps under danger of being forced to revert all changes done to the map in your area / country.
If any user were to do such a thing, it would taint all the work that person did on the maps and Waze would need to reverse out all those edits. There could also be other adverse effects. Waze has already had to remove all the maps for Chile, and other South American countries because the source of the map data was not properly licensed (not the result of any Waze action).
Users may negotiate with officials in their country for access to aerial images that Waze can use. The user must be careful not to give the impression that they are acting on behalf of Waze. But as an interested citizen any user can speak with local authority, in a local language, to explain the benefits to their country in making aerial images freely available as a public good.
Note that external copyright information does not include any source of information that is provided by Waze through the internal tools of the online editor or application. Also any information developed independently by a user being physically present at a site is acceptable to add to the map as long as it is provided without copyright.

