(New page: ==Map Editor Layout== There are four main areas of the Map Editor: 600px # At the top, a tool bar with a search box, and buttons to Save, Undo, R...) |
No edit summary |
||
| Line 133: | Line 133: | ||
===Permalink=== | ===Permalink=== | ||
In the lower right corner is the underlined word ''permalink.'' The permalink changes any time the map moves or objects are selected and deselected. It is a link to the exact view you are currently seeing in the map display area. You can click it to refresh the map area, or you can right-click and copy the address of the permalink to share via email or in the Waze forums. | In the lower right corner is the underlined word ''permalink.'' The permalink changes any time the map moves or objects are selected and deselected. It is a link to the exact view you are currently seeing in the map display area. You can click it to refresh the map area, or you can right-click and copy the address of the permalink to share via email or in the Waze forums. | ||
==Navigating the Map Editor== | |||
* Move around the map by clicking and dragging on the map itself | |||
* There are four ways to zoom the map: | |||
# There is a zoom controller on the top left-hand corner of the map. You can either drag the slider up and down, or click on the + and - buttons. | |||
# Double-clicking any point on the map will zoom in one level and center the map on that point. | |||
# Scrolling up with your mouse wheel will zoom in on a certain point, and scrolling down will zoom out, keeping the mouse pointer's location in the same location. On Macintosh systems with a track pad or similar mouse device, dragging left and right performs this action | |||
# Hold the ''Shift'' key down and then click and drag a rectangle on the map. The map will then zoom in onto the selected area: | |||
[[Image:Shift_zoom.png|500px|center]] | |||
Revision as of 19:19, 22 September 2011
Map Editor Layout
There are four main areas of the Map Editor:
- At the top, a tool bar with a search box, and buttons to Save, Undo, Redo, Trash and Add
- At the left are two elements:
- In the background, is your username, current points and number of changes currently executed on the map which need to be saved [image]
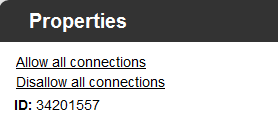
- In the foreground is an expandable drawer which displays the properties of the currently selected object. Any editable properties are edited from this drawer panel. [image]
- On the right-side of the main window, really inside the main window space, is a small white on dark blue + icon. This is the layers selector.
- The map display area, which takes up the majority of the space, is the map display area. This has the ability to display aerial/satellite photography, streets, junctions, landmarks, red light/speed cameras, GPS tracks, map problems, and your editable area. All of these are discussed below [image]
Map Editor Controls
The Tool Bar
Search box
In the wide search box, you can enter an address, city, state, country, landmark or point of interest, or a combination of those. After hitting Enter or clicking the Find button, you will either be taken to the only result, or be given a list of matches to select from.
For example, entering "757 Mohawk St, Columbus, OH" will center the map and drop a search marker directly on that address.
However, searching for "main st, new york" will get you a list of matches to select from.
Save Button

Shortcut key: Ctrl+s
The Save button saves all of the current changes you have made. This process is a little more complex than this sounds, but that is what it does. In order to save properly, your browser receives messages back from the Waze server if there were any errors. If there is an error when saving, the editor will try to give you a detailed error message and a suggestion to fix it. The map view will also show the error area highlighted in a bright circle.
Undo Button

Shortcut key: Ctrl+Z
The Undo button will undo successive previous changes with each click. A change can be deleting a geometry node from a segment or renaming a landmark. It can also be a change to multiple objects at once. For example, if you multi-select 25 street segments to change them from No Entrance to 2-way, that is considered a single change. Therefore, one click on Undo will undo that change for all 25 segments.
Redo Button

Shortcut key: Ctrl+Shift+Z
The Redo button will re-apply any changes which have been recently undone with the Uno button
Delete Button

Shortcut key: Delete (Del)
The Delete button will delete, or trash, any currently selected objects. If you have multiple objects selected, you will be prompted to confirm the multiple deletion. The only object you can currently multi-select is segments.
Undo also works on the Delete button. Objects are not actually deleted until the Save button is clicked. After that, you cannot Undo any edits or deletes.
Add Button

The Add Button is not reall a button but actually a menu. You do not need to click on it, just hover your mouse over it and the menu of objects you can add will appear below.
From this menu, you can add a Road, a Roundabout, or a Landmark. Details for each of these actions are found in the Editing Manual.
Left Background
On the background of the left side of the window is a message showing your username, your current point total for the server you are editing on (North America or World), and a count of the number of unsaved changes currently queued up for saving.
Properties Drawer

The Properties drawer is initially shown as a tab which expands to the left when clicked. When there is no object selected on the map, the drawer looks empty. When an object is selected, the contents of the Properties drawer change to reflect the available properties, both editable and non-editable, of that object. Therefore, the look of the drawer when a Landmark is selected is quite different from that of a street segment.
Layers
On the right-side of the main window, you will see this small icon: ![]() .
.
When clicked, it expands to display the layers or object types which are available for display on the main map. When the box next to the layer name is checked, then that layer is active and being displayed.
Each of the layers is discussed in more detail later, but a short desription of each is directly below.
Bing Aerials
Waze uses aerial and satellite photography provided by Bing (or VirtualEarth).
Roads
Roads are all of the streets, alleys, highways, and freeways which make up the driveable street system in Waze. Depending on the zoom level, some street types are not displayed so that the map is not too cluttered.
GPS points
This layer will show tracks from Waze users as they drive with Waze running. Waze records and plots the GPS coordinate of drivers. This layer is useful for relatively accurate placement of new or moved roads when aerial photography is not yet updated.
Landmarks
Landmarks are also known as POIs (Points of Interest). These can really be just about anything, but tend to be things like parks, gas stations, cemeteries, transit stations, etc.
Speed cameras
Speed cameras, red-light cameras and dummy cameras are shown on this layer. Drivers report camera location and type, and a map editor is required to confirm the existence of the camera, precise location and direction the camera is point before it will appear on the client.
Problems

The Waze servers are constantly analyzing driver's GPS tracks to determine when there might be a problem with the map and uses the Problems layer to alert the editors. Some types of problems tracked are missing roads, incorrect turns allowed at intersection, wrong direction of road.
Editable areas
Where you can edit is determined primarily by where you have driven. Edit rights are granted within a one-mile radius of where you have driven with Waze running. Your editable area is shown in lighter-colored areas surrounded by a black border. Users who are Area Managers will also see their managed areas in a colored highlighted area.
Map Display Area
All the layers currently selected for display show up in the map display area, which takes up the majority of the browser window. Any object displayed is selectable and editable, depending on your editing rights in the area you are viewing. Select a street and change its geometry. Select a landmark and change its name. Add a road where one should be, or delete a road which should no longer appear.
There are four controls or displays in the corners of the map display area:
Zoom Control

In the upper left corner, the zoom control is one way to adjust the zoom level, or altitude, or the map display area. Clicking + will move in closer, showing more detail. Clicking - zooms out/higher and removes detail. You can also click and drag the selector in between the + and - buttons.
Scale
In the lower left corner is a small graphic showing the current scale of the map display area.
Lat/Lon
The upper right corner shows the latitude and longitude of the mouse pointer as it moves over the map.
Permalink
In the lower right corner is the underlined word permalink. The permalink changes any time the map moves or objects are selected and deselected. It is a link to the exact view you are currently seeing in the map display area. You can click it to refresh the map area, or you can right-click and copy the address of the permalink to share via email or in the Waze forums.
- Move around the map by clicking and dragging on the map itself
- There are four ways to zoom the map:
- There is a zoom controller on the top left-hand corner of the map. You can either drag the slider up and down, or click on the + and - buttons.
- Double-clicking any point on the map will zoom in one level and center the map on that point.
- Scrolling up with your mouse wheel will zoom in on a certain point, and scrolling down will zoom out, keeping the mouse pointer's location in the same location. On Macintosh systems with a track pad or similar mouse device, dragging left and right performs this action
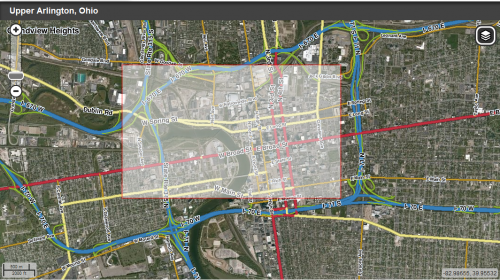
- Hold the Shift key down and then click and drag a rectangle on the map. The map will then zoom in onto the selected area:


