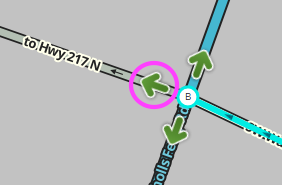
(สร้างหน้าด้วย "{{mbox|type=important|text=There is to be '''no campaign''' to replace existing wayfinders, micro-dog-legs, or any other segment-based structure with a T...") |
(→U-turn: updated link to U-Turn example) |
||
| (ไม่แสดง 2 รุ่นระหว่างกลางโดยผู้ใช้คนเดียวกัน) | |||
| บรรทัดที่ 16: | บรรทัดที่ 16: | ||
[[File:Wme_turn_override_list.png]] | [[File:Wme_turn_override_list.png]] | ||
{{clear}} | {{clear}} | ||
*Waze Selected (default) (this gives the default voice prompt turn, exit, keep right/left, which is defined by street names, angles, road types, etc) | *Waze Selected (default) (this gives the default voice prompt turn, exit, keep right/left, which is defined by street names, angles, road types, etc) | ||
*None (No verbal instruction is given) | *None (No verbal instruction is given) | ||
| บรรทัดที่ 34: | บรรทัดที่ 35: | ||
After creating the TIO, create a Map Comment [[File:Wme_mapcomment_button.png]] similar to the following example. | After creating the TIO, create a Map Comment [[File:Wme_mapcomment_button.png]] similar to the following example. | ||
*Type; Point | *Type; Point | ||
*Title: TIO | *Title: TIO | ||
| บรรทัดที่ 39: | บรรทัดที่ 41: | ||
*Expiration: None | *Expiration: None | ||
[[File:Wme_mapcomment_for_tio.png|border]] | [[File:Wme_mapcomment_for_tio.png|border|link=Special:FilePath/Wme_mapcomment_for_tio.png]] | ||
{{clear}} | {{clear}} | ||
| บรรทัดที่ 51: | บรรทัดที่ 53: | ||
{{clear}} | {{clear}} | ||
===U-turn=== | ===U-turn=== | ||
This works well for one way segments that have a u-turn only lane. You can post a " | This works well for one way segments that have a u-turn only lane. You can post a "Keep Right" verbal prompt on the first right turn and "U-Turn" on the second one. | ||
[[File:UturnTIO.png|left|200px]] | [[File:UturnTIO.png|left|200px]] | ||
This TIO can only be used as an alternative solution for 'small' U-turn constructions. Do not use it for 'large' U-turn constructions or for intersections that also have side streets. | This TIO can only be used as an alternative solution for 'small' U-turn constructions. Do not use it for 'large' U-turn constructions or for intersections that also have side streets. | ||
| บรรทัดที่ 57: | บรรทัดที่ 59: | ||
[https://www.waze.com/editor | [https://www.waze.com/en-US/editor?env=row&lon=100.59322&lat=13.67572&zoom=9 Live Sample] | ||
{{clear}} | {{clear}} | ||
| บรรทัดที่ 93: | บรรทัดที่ 95: | ||
==Identifying Instruction Overrides on the map== | ==Identifying Instruction Overrides on the map== | ||
#The default way to determine that a turn has an Override Instruction set is to hover over the turn arrow. | |||
#The default way to determine that a turn has an Override Instruction set is to hover over the turn arrow. | |||
#[[Global:Scripts#WME_Toolbox|Toolbox]] helps to make identifying turns with override instructions set. | #[[Global:Scripts#WME_Toolbox|Toolbox]] helps to make identifying turns with override instructions set. | ||
รุ่นแก้ไขปัจจุบันเมื่อ 13:39, 10 มีนาคม 2564
| There is to be no campaign to replace existing wayfinders, micro-dog-legs, or any other segment-based structure with a Turn Instruction Override. |
Creating Instruction Overrides
| Before you set a Turn Instruction Override, It is highly recommended that you consult with a Region Manager or Country Manager. Link |
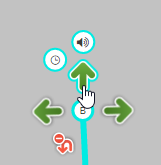
When in WME and you click on a segment and hover over a Green or Yellow Turn Connection/Restriction Arrow, both the Time Based Turn Restriction (TBTR) clock AND the Turn instruction Override speaker icon will appear. If the turn is Red (restricted), then the override icon will not appear.
Available Instruction Overrides
When you click on the Speaker, you have the following choices:

- Waze Selected (default) (this gives the default voice prompt turn, exit, keep right/left, which is defined by street names, angles, road types, etc)
- None (No verbal instruction is given)
- Turn Left (The instruction "Turn Left" is given)
- Turn Right (The instruction "Turn Right" is given)
- Keep Left (The instruction "Keep Left" is given)
- Keep Right (The instruction "Keep Right" is given)
- Continue (NOT CURRENTLY AVAILABLE)
- Exit Left (The instruction "Exit Left" is given)
- Exit Right (The instruction "Exit Right" is given)
- Uturn (The instruction "Uturn" is given)
When something other than "Waze Selected" is the selected option, the Instruction Override speaker icon changes from ![]() (Cyan) to
(Cyan) to ![]() (Orange). This icon is shown when you hover over a turn arrow.
(Orange). This icon is shown when you hover over a turn arrow.
Add a Map Comment for an Instruction Override
| At this time it is suggested to add a comment to any TIO you add to the map. |
After creating the TIO, create a Map Comment ![]() similar to the following example.
similar to the following example.
- Type; Point
- Title: TIO
- Comments: specific to the override put in place and why..
- Expiration: None
ไฟล์:Wme mapcomment for tio.png
When to Use Instruction Overrides
Exit Right
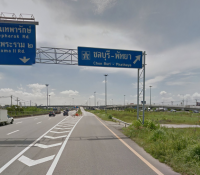
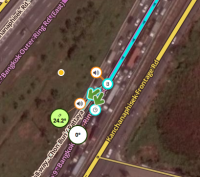
When there is a the Big Overhead Sign (BOS) indicating an exit right. In left-hand drive countries like Thailand Waze only uses "Exit Left" as a standard instruction. With a TIO you can force an "Exit Right" instruction
U-turn
This works well for one way segments that have a u-turn only lane. You can post a "Keep Right" verbal prompt on the first right turn and "U-Turn" on the second one.
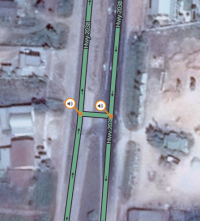
This TIO can only be used as an alternative solution for 'small' U-turn constructions. Do not use it for 'large' U-turn constructions or for intersections that also have side streets. For guidance on U-turn constructions, go here.
Streets not meeting at right angles
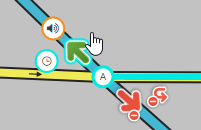
When streets meet at some kind of diagonal, the default turn instruction may end up being a "stay to the left/right" even though the driver would consider it a left or right turn. Allow the segments to meet at their actual angles and create an instruction override so that the instruction the driver is expecting will be given.
ALSO CONSIDER: The departure angle in Waze Map Editor is also shown in the app closure interface. Angles which are too close, under 20° can overlap in the app, and so should be avoided.
Simple Wayfinder
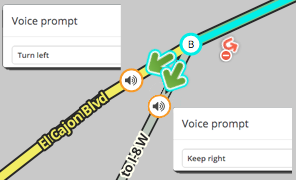
Simple wayfinders use a turn instruction override where an instruction would not normally be voiced. This is most often a "stay right" or "stay left." A basic example is a roadway with a split where left lanes turn left and right lanes go straight ahead. To ensure the driver is kept on the correct side of the roadway to stay on the expected route, we create an instruction override to ensure the driver is given enough advance noticed to make sure they are on the correct side
The image here is a composite showing both turns with the override set and which instruction has been applied in this specific case. Drivers continuing straight, the app will give the driver the instruction "stay to the right to El Cajon Blvd." For drivers getting into the on-ramp, the app will say, "turn to the left to I-8 W."
Continue onto Onramp
NOT CURRENTLY AVAILABLE
To reduce confusion, it is advised to use the "Continue" instruction in situations like a street heading directly onto a highway or freeway onramp, such as shown here.
At-Grade Connector
Depending on the length of an at-grade connector, it may make sense for it to either instruct "keep right/left" or "turn right/left." Use a Turn Instruction Override to ensure the app voices the most appropriate instruction to the driver. An example of an at-grade connector using an instruction override is shown below:
When Not to Use Instruction Overrides
Complex Wayfinder
A complex wayfinder is one where the legs (child segments) are named differently than the subsequent segments. The wayfinder segments are named for the Big Overhead Sign (BOS) verbiage for clarity.
For these kinds of wayfinders, a turn instruction override does not have the required functionality and should not be used.
