| Ta nowa strona jest obecnie w trakcie modyfikacji. Przedstawione informacje należy uznać za wersję roboczą, która nie jest jeszcze gotowa do użycia. Treść jest przygotowywana przez jednego lub więcej użytkowników. Nie wprowadzaj żadnych zmian zanim nie przejrzysz tego forum. |
Szybka Nawigacja do...
| Edytowanie | |
| Poradnik edytowania | Updated Editing Guidelines ● Edycja Map - szybki start |
| Edytor Map Waze | Zastrzeżone funkcje edytora map ● Ochrona mapy ● Interfejs i kontrolki Edytora Map |
| Drogi | Kategorie dróg w Polsce ● Tworzenie i edycja segmentów dróg |
| Ograniczenia prędkości | Przewodnik po ograniczeniach prędkości ● |
| Nazewnictwo | Wzorce nazywania dróg ● Nazywanie ulic ● Tabela skrótów ● Miejscowości o takich samych nazwach |
| Pierwsze kroki w edytowaniu | Najlepsze Praktyki ● Editing Basics ● Editing Bridges and Tunnels |
| Połączenia | Skrzyżowania ● Ronda ● Niepotwierdzone i potwierdzone skręty |
| Problemy i Błędy | Zgłoszenia użytkowników (UR) ● Problemy mapy (MP) |
| Wszystko o Miejscach | Przewodnik po miejscach ● Standaryzacja nazw ● Zgłoszenia aktualizacji miejsc (PUR) ● Miejsca wjazdu/wyjazdu |
| Ograniczenia i blokady | Planowe ograniczenia w ruchu ● Zamknięcia w czasie rzeczywistym |
| Routing i Nawigacja | Oblicznie trasy ● Navigation Instructions |
| Wydarzenia | MapRaid ● WoW |
Planowe ograniczenia ruchu (lub oparte na czasie) pozwalają Waze kontrolować przejazd pojazdów przez drogi i skręty, które mogą być wykluczane w zależności od godziny, dnia czy typu pojazdu. Typowe przykłady użycia to ulice dla transportu publicznego, blokady skrętów podczas godzin szczytu, zmiany kierunku jazdy, sezonowe zamknięcia, bramy, ruchome mosty oraz przeprawy promowe.
Przegląd
Istnieją cztery sposoby kontroli ruchu: ((Hyperlink to each article covering these))
- Wydarzenia
- Tymczasowe zamknięcia dróg
- Planowe ograniczenia ruchu (ten artykuł)
- Odłączanie segmentów dróg
((Create article on why to use each one and point to that article. If small enough make a template and insert here. That new article becomes a type of disambiguation page for road closures and restrictions.))
Niniejszy artykuł omawia sposób tworzenia planowych ograniczeń. Planowe ograniczenia mogą być oparte na:
- całym segmencie kontrolującym ruch drogowy w jednym lub obu kierunkach
- konkretnych skrętach z jednego segmentu w drugi
Każde z tych ograniczeń może podlegać dalszym na podstawie kombinacji:
- typ pojazdu (samochody ciężarowe, autobusy, materiały niebezpieczne, itp.)
- pora dnia, dzień tygodnia i zakres dat.
Przykłady:
- Rampa tylko dla pojazdów ciężarowych
- Zakaz ruchu ciężarówek w weekendy w godzinach 09:00-15:00
- Zakaz skrętu w lewo w dni powszednie w godzinach 07:00-09:00 i 16:00-18:00
- Pas dla pojazdów z wieloma pasażerami
- Jednokierunkowe pasy szybkiego ruchu na autostradzie, które w porze porannej i wieczornej umożliwjają ruch dwukierunkowy
- Pojazd holujący przyczepę
Chociaż jest to bardzo elastyczny system, wymaga on (co początkowo może wydawać się bardzo skomplikowane) interfejsu do zarządzania wieloma możliwymi kombinacjami. Bardzo ważnym jest, by wszelkie zmiany bieżących planowych ograniczeń na mapie zostały wprowadzone z najwyższą ostrożnością, nie niszcząc godzin pracy poprzednich edytorów mapy. Dlatego upewnij się, że wprowadzasz zmiany do harmonogramu ograniczenia z dużą rozwagą i cierpliwością.
Segments

When no traffic or certain vehicles are not permitted on a segment (or road), you can set restrictions on the segment directly preventing any traffic flow across the segment. This is easier that trying to restrict all the turns that come from other segments to this one segment. Some restrictions may only affect a certain direction, or sometimes a road allows traffic flow one way and then later in the day it switched to the opposite direction.
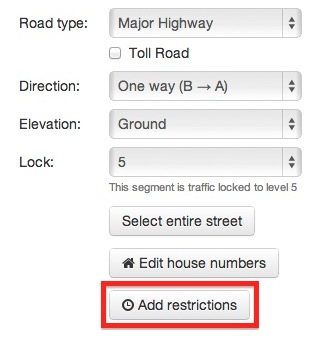
Segment restrictions are added or edited through the ‘Add/Edit restrictions’ button in the left pane (or the ‘T’ keyboard shortcut).
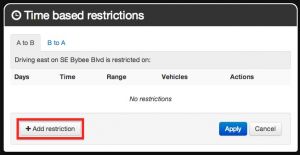
That brings up the "Time based restrictions" panel. Segments supporting two-way traffic will display two tabs: "A to B" and "B to A" referring to the letters A and B on either end of the selected segment indicating the direction of orientation related to the direction of traffic flow.
The text below the tab will describe which direction of travel is associated with that tab to help determine which traffic direction is represented by each tab.
Click the "+ Add restriction" button to create a new restriction.


See the section Setting restrictions for information on how to set the restriction. Segment and turn restrictions are set using the same instructions covered below. You can create multiple restrictions for the segment to allow for restrictions that might only occur at different times of the day, or maybe the restriction is at different times on the weekdays than on the weekends.
Once you create the restrictions for one direction you can simply copy all the restrictions to the other direction with the link labeled "Copy all to the other side." Otherwise only one direction of travel will be restricted and the other direction will be fully open.
Once a restriction is created you can edit ((Pencil icon)) or remove ((X icon)) a restriction with the appropriate action buttons.
Multiple segment selection
Multiple segments can be selected at once for batch editing of restrictions. Selecting multiple segments is done by clicking the segments while holding the Ctrl button (or Cmd on Mac computers).
A few things to note when editing multiple segments:
- Note the directionality of the segments - two neighboring segments can be with different A->B directionality. In one of them the A->B direction can be eastbound and in the other it can be westbound at the same time.
- When multiple segments are selected with different restrictions set on them, they will appear in a different section of the panel under the title: 'These restrictions only apply to some of the segments selected:' Click the ‘Apply to all’ link to the right of the restriction line to propagate the restriction to all the selected segments.
Turns
When only certain turns are restricted from one segment to another, this method of restriction should be selected and not the whole segment.
All turning traffic restricted at all times
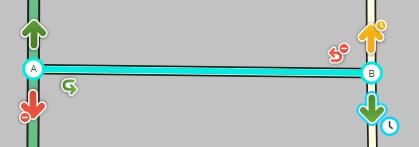
Turns that are restricted to all traffic (all vehicle types) are set with turn arrows—the arrows that appear at the end of a selected segment. A restricted turn is indicated by a red arrow with a do not sign next to it. A turn that is open (not restricted) to all traffic is indicated by a green arrow.
To change from a green arrow (open) to a red arrow (fully restricted) simply click on the arrow and it will toggle between the options.
((Link to articles on the various turn arrow tips and tricks))
((probably include something on U turns too))
Scheduled turn restrictions
When not all times, days, dates, or vehicles are restricted from turning, you can set a scheduled turn restriction from one segment to another. Turns that are restricted to all traffic during certain times of the day are "time based turn restrictions".
((Insert photo of "no left turn 7a-9a 4p-6p" sign or similar))
Accessing the editing panel is also accessed through the turn arrows. Select the desired turn arrow and click it until it becomes green. With the mouse hovering over the green arrow you will see a clock icon next to the arrow. Click on the clock to bring up the Time based restriction panel for that turn.
You should then see the Time based restrictions panel.
((Insert Create a new restriction panel))
Press the "+ Add restriction" button to create a new restriction.
See the section Setting restrictions for information on how to set the restriction. Segment and turn restrictions are set using the same instructions covered below. You can create multiple restrictions for the segment to allow for restrictions that might only occur at different times of the day, or maybe the restriction is at different times on the weekdays than on the weekends.
Once you enter the restriction(s) and press the Apply button, you will see a Yellow arrow instead of the green arrow indicating that turn has time based restrictions enabled.
To access the edit panel for that turn, simply click the white clock that appears next to the yellow arrow. If you only click on the yellow arrow, you will turn it red indicating all times, days, and vehicles are restricted. Note that your prior settings are saved and if you click the red arrow again it will return to yellow with the last saved settings.
Setting restrictions
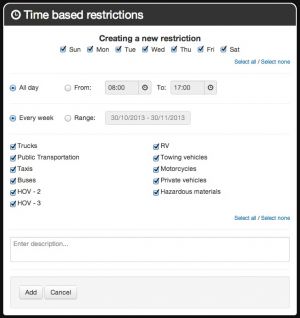
Both segment and turn restrictions are created and edited using the same user interface, but each one is accessed through a different method discussed above.
((Insert image of default Time based restrictions panel))
Configure the restriction as required using the guidelines described for each setting.
After configuring the restriction as required, press the Add button on that panel to save the restriction and return to the Time based restrictions panel. Continue adding restrictions in the same way to cover combinations that may only restrict a few house per day, but at different times of day.
Days of week
Select the days of the week that the restriction will be active. Use the Select all or Select none link to to more quickly change all the check boxes. The default is all days of the week. Your display order for the days will depend upon your country settings in your browser and may not exactly match the image above.
Time of day
For restrictions that apply all day long, use the default setting of All day. If the restriction is for only certain periods of time during the day, then select the From radio button to allow the time to be changed. You can click the hours or minutes fields to enter times directly, or click the clock icon next to the time to enable input panels.
The time is entered in 24-hour format meaning there is no AM or PM entered. Instead AM times are entered directly and PM times are entered by adding 12 to the hour. For example a schedule of 10:00 AM to 3:00 PM would instead be entered as 10:00 to 15:00. The minutes are not any different between the systems.
The time that should be entered is the local time of the road as would be displayed on the local signs. The Waze server already knows the local time zones and will schedule the restriction correctly.
Daylight savings time is automatically accounted for as long as the Waze client app is properly set to the correct local time.
Entering midnight
If a scheduled restriction is between 8:00 PM and Midnight, then enter "20:00 - 23:59". Technically you can also enter "20:00 - 00:00" to get the same result.
Crossing midnight
If a restriction occurs only during night time hours and opens in the morning e.g., restricted between 10 PM and 5 AM, then enter the From time as 22:00 and the To time as 05:00. You will notice an information box that says the restriction will end of the following day. If this restriction is only on a certain day of the week, e.g., Saturday night and Sunday night, then select the day of the week for Sat and Sun matching the start of the restriction. There is no need to include Monday because it will be automatically covered. Including the Monday check box would then add a third day starting at 10 PM Monday.
Date range
The default setting is Every week meaning there is no limit to the date range so as soon as you add the restriction it will be active every week until it is removed. Optionally you can select the radio button for Range of dates to limit the restriction to a certain number of days. Press the button displaying the date to display two calendars. The one one the left shows the start date and the calendar on the right shows the end date of the restriction. Note these date are inclusive meaning the restriction will include both dates (and all the ones in between) when determining the restriction. When you have selected the date range press the green Apply button. The date range is displayed in DD/MM/YYYY format. To remove the date range, simply select the Every week radio button again. ((Is this date format a bug since I am in the US, but my screen shows DD/MM/YYYY?))
Again the end date will consider the entire day based on any time settings also configured. If the time crosses midnight, the next day will automatically be included for that time period and then the restriction will no longer be active after that ending time.
Vehicle type
There are some situations that only restrict certain vehicle types from passing through the turn or segment. Examples of this include HOV lanes, bus stops, and truck-only exit ramps.
((Insert some photos of real-world signs))
Also, some turns may be taken by all traffic except certain vehicles. Examples of this include no truck zones.
((Insert some more photos))
The default condition is All vehicle types are included in the restriction, but if only certain vehicles are going to be restricted, press the (Edit) link next to Restriction for all vehicle types to bring up the vehicle type selector.
Add a check mark only the vehicles that should be restricted and leave the others unchecked. Use the Select all or Select none link to to more quickly change all the check boxes.
Note: Currently the Waze client app does not differentiate between different vehicle types, so these setting will not currently have any affect on routing.
Examples
The following examples cover specific situations to provide more guidance. Some of the examples below will be turn based restrictions, but the method is the same for the segment restrictions.
Date range results
The following table includes example date range combinations and the resulting restrictions that it would generate:
| Days of the week | Time Range | Date Range | Restriction Result |
| Sunday | All day | 12.1.2014 - 12.31.2014 | Every Sunday on December 2014, from 00:00 until 23:59:59. |
| Monday - Friday | 09:00-11:00 | Every Week | Every weekday from 9am to 11am. |
| Thursday | 23:00-03:00 | Every Week | Every Thursday from 23:00 until every Friday at 03:00 |
| All | All day | 7.3.2015 - 7.15.2015 | From July 3rd 2015 at 00:00 until July 15th at 23:59:59 |
Simple time based restrictions
For a turn or segment that is restricted (not allowed) between 10 am and 2 pm daily, click the radio button next to "From", then enter "10:00" and "14:00" as the start and end times of the restriction.
((Insert image of panel with 10:00 and 14:00 entered))
Click "Add" to add the restriction. You will be returned to the Time based restrictions panel. The panel should now reflect the added restrictions.
((Insert image of panel with restriction added))
For a turn that is restricted between 7 and 9 am, and again between 4 and 6 pm, add the restrictions one-by-one as instructed above. When added, the panel should look like this.
((Insert image of panel with 7-9 and 16-18 restrictions added - n peters to bienville example))
Overnight time based turn restrictions
Time-of-day restriction periods may cross midnight. For a turn that is restricted between 8 pm and 6 am, enter the From time as 20:00 and the To time as 6:00.
((Insert image of panel with 20-23:59 and 0-6 restrictions added - bourbon street example))
Date-based turn restrictions
Some restrictions may also only be in place on certain days of the week. For a turn that is restricted "weekends", check only the boxes for "Sat" and "Sun".
((Insert image of input panel with M-F unchecked))
Time-and-date-based turn restrictions
For a turn that is restricted "2 pm to 4 pm, weekdays", when adding the restriction, uncheck the boxes next to "Sat" and "Sun", and enter "14:00" and "16:00" in the time boxes.
((Insert image of input panel with M-F checked and 14-16 entered))
Time-of-year and holiday turn restrictions
Some restrictions may only be in place during certain times of year. If on a specific date and time, set the appropriate combination.
Some restrictions may follow moving holidays. For example, a turn that is not allowed on Labor Day (US: the first Monday in September), check only the box next to "Mon" and enter "01/09/2013" (September 1st; dates are in DD/MM/YYYY format) and "07/09/20xx". Clever, right?
((Insert image of input panel with all that stuff entered))
((Alan, I am not sure I followed your description and don't recall where this was covered or if it still exists, so someone needs to confirm and clarify the instructions. Kent))
Reversible road
((explain that a reversible road is set as two-way on the main map and then restricted in the panel. this merits its own section imo as it is a somewhat complex topic))
Reversible roads with vehicle type restrictions
Some reversible roads may also be restricted to certain vehicle types. A common example of this is the reversible HOV lane.
((explain that too))


