Welkom editor!
Deze pagina biedt de basiskennis die nodig is voor het aanpassen van de Waze kaart. Sommige zaken worden op de waze kaart misschien anders getekend dan op een gewone kaart. Dit doen we omdat Waze een navigatie tool is en geen topografische kaart. Ons advies is om na het lezen van deze pagina, eerst een bepaald type wijzigingen op te pakken om zo gewend te raken aan het aanpassen van de Waze kaart. Anders zou je wel eens overvoerd kunnen raken met informatie. Vergeet niet om je aan te melden bij Slack, ons belangrijkste communicatie platform. Onze gemeenschap helpt je graag met al je vragen.
Hoe kan je de Waze kaart editor (WME) starten
- Log in op www.waze.com. Voer bij de login invoervelden je gebruikersnaam en wachtwoord in, zoals je deze ook gebruik voor bijvoorbeeld de Waze app.
- Klik op live map

- Zoek je locatie op
- Klik op het potloodje edit the map (zie plaatje)
Of ga direct naar www.waze.com/editor/?env=row. Na ingelogd te zijn, zie je het Waze kaart editor (WME) scherm:
Meer details over de mogelijkheden, de knoppen en menu's van de WME, kan je vinden op de wereldwijde Waze wiki WME Interface and Controls pagina.
Start in Practice Mode
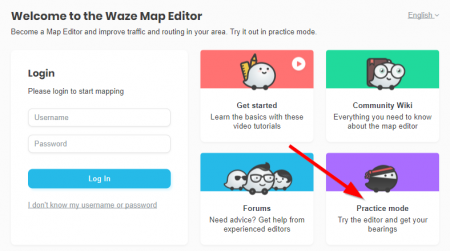
Voordat je de kaart echt gaat bijwerken zou je eerst in practise mode kunnen gaan oefenen. Ga naar de WME server en kies Practice Mode. Wanneer je al bij de WME aangemeld was moet je eerst even uitloggen.
De Waze Map Editor heeft een Practice mode waarmee je bijna alle mogelijke acties met de editor kunt uitvoeren, maar je kunt je werk niet opslaan. Voor het wel opslaan van wijzigingen moet je eerst inloggen. Practice mode is handig voor nieuwe editors maar ook voor meer geoefenden om nieuwe danwel gecompliceerde wijzigingen uit te proberen.
Meer informatie kun je vinden op de global Practice Mode pagina.
De kaart editen
De meeste beginnende editors proberen eerst om de Waze kaart een zo perfect mogelijke afspiegeling te laten zijn van het satellietbeeld. Ze splitsen wegen met gescheiden rijbanen, voegen voet- en fietspaden toe, maken de bochten mooi vloeiend en tekenen heel gedetailleerd gebouwen. Maar, Waze is NIET een topografische kaart, maar een navigatie systeem dat je naar je bestemming brengt op de beste/snelste manier. Daarom, houd de Waze kaart simpel: Hoe minder detail, des te duidelijker de kaart, des te minder data is nodig, des te sneller de berekeningen, en des te eenvoudiger het onderhoud. Houd dat in gedachten bij het bewerken van de kaart!
Voeg een Weg toe
- Ga met je muis naar het
 menu bovenin het editorscherm en selecteer in het dropdown menu "weg".
 - Klik met de muis op de plek van de kaart waar je een nieuw wegsegment wilt beginnen.
- Verplaats de muiscursor langs de route van de weg en klik op elk punt waar de richting van de weg wijzigt. De knikpunten heten geometrie nodes.
- Dubbelklik (of Shift-klik) om het eindpunt van het segment te maken.
- Selecteer het segment opnieuw en geef de details van het wegsegment in op het menu aan de linkerkant van het scherm.
- Klik op Adres om Land, Stad en Straatnaam in te geven. Wanneer er geen Stad en/of Straatnaam beschikbaar is klik dan het geen vinkje aan. Zolang de Stad en/of Straatnaam ontbreken wordt het wegsegment rondomrand vertoond.
- Maak echt alleen wegen aan waarvan je zeker bent dat zij (al) bestaan.
Voor meer informatie over het aanmaken van wegsegmenten kan de globale pagina Creating and editing road segments geraadpleegd worden.
Voeg een Plaats toe
Een plaats is een mogelijke bestemming, zoals een school, ziekenhuis of bungalowpark. Ga met je muis naar het ![]() menu om de Plaats categorieën op te roepen. Kies er één en klik op de kaart om het toe te voegen. Zo voeg je een puntplaats toe. Gebruik het linker menu om de plaats te wijzigen. Bijvoorbeeld in een gebiedsplaats en om de diverse details in te voeren. Voor een gebiedsplaats moet je de geometrie nodes gebruiken om de plaats zijn voor te geven.
menu om de Plaats categorieën op te roepen. Kies er één en klik op de kaart om het toe te voegen. Zo voeg je een puntplaats toe. Gebruik het linker menu om de plaats te wijzigen. Bijvoorbeeld in een gebiedsplaats en om de diverse details in te voeren. Voor een gebiedsplaats moet je de geometrie nodes gebruiken om de plaats zijn voor te geven.
Voor meer informatie over Plaatsen zie de Plaatsen pagina.
De elementen op de kaart wijzigen
Voor het wijzigen van een bestaande weg of plaats moet dit element eerst geselecteerd worden. Na het selecteren kan je de vorm van een gebiedsplaats dan wel de loop van een weg aanpassen door de geometrie nodes naar een andere plek te trekken.
Geometrie nodes
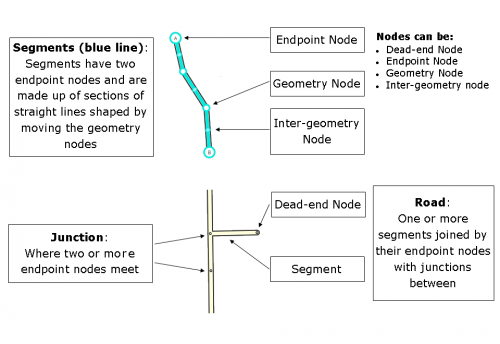


Witte rondjes verschijnen wanneer je een wegsegment of een gebiedsplaats aan het bewerken bent. De vorm kun je wijzigen door met de muis zo'n wit rondje (geometrie node) naar een andere plek te trekken. Een geometrie node kan verwijderd worden door deze te selecteren en vervolgens op de d toets te drukken. Voor het verwijderen van meerdere geometrie nodes: houd de d ingedrukt en ga met de muis over de te verwijderen nodes.


De kleinere witte rondjes halverwege tussen de geometrie nodes zijn de "inter"-geometrie nodes. Wanneer je zo'n inter-geometrie node aanklikt en versleept, wordt het een reguliere geometrie node met weer twee inter-geometrie nodes aan weerszijden.
- TIP: Via het
 Lagen icoon, boven rechts in de Map Editor, kan je de vertoning van de weg laag aan- en uitzetten. Wanneer deze laag uitstaat heb je beter zicht op de wegstructuur zoals het satellietbeeld die vertoont.
 - TIP: Druk op Delete om een geselecteerd wegsegment of een geselecteerde plaats of kruising te verwijderen.
voor meer informatie over het maken en wijzigien van wegsegmenten, zie de globale Wazeopedia pagina op Editing existing roads.
Wegen verbinden
Wanneer je een nieuwe weg tekent of een bestaande weg verplaatst maakt de editor automatich een nieuwe kruising aan.
- Wanneer je een nieuwe weg, start of eindigt op een bestaand wegsegment wordt automatisch op die plek een kruising gemaakt.
- Wanneer je het begin- of eindpunt van een weg verplaatst naar een wegsegment dan wordt hier automatisch een kruising gemaakt.
- Wanneer je een kruising verplaatst naar een weg of een andere kruising, dan worden alle betrokken wegen op deze niewe plek met elkaar verbonden met een kruising.
Wegen samenvoegen
- Selecteer twee gekoppelde wegsegmenten en
- klik op het
 icoontje wat boven de koppeling vertoond wordt.
 - Een klein windowtje wordt vertoond: Segmenten samenvoegen? Als er conflicterende gegevens zijn, worden de gegevens gebruikt van het eerst geselecteerde segment. Klik op Toepassen om door te gaan of klik buiten het windowtje om de samenvoegactie te cancellen.
Kruizende wegen
Wanneer twee wegen elkaar kruisen op dezelfde hoogte dan kunnen ze eenvoudig met elkaar verbonden worden. Handig wanneer je in een buurt meerdere nieuwe wegen tekent door eerst de wegen te tekenen en pas later de kruisende verbindingen te maken. De kruising maken gaat als volgt:
- Selecteer beide kruisende segmenten
- Klik op de
 welke verschijnt op de plaats van de kruising.
 - De kruising is gemaakt.
De ![]() wordt niet vertoond wanneer de wegen elkaar meerdere keren kruisen en ook niet wanneer ze gedefinieerd zijn met een verschillende hoogte. Wanneer het kruisingsicoontje niet vertoond wordt kan het soms helpen om het zoom-niveau te wijzigen.
wordt niet vertoond wanneer de wegen elkaar meerdere keren kruisen en ook niet wanneer ze gedefinieerd zijn met een verschillende hoogte. Wanneer het kruisingsicoontje niet vertoond wordt kan het soms helpen om het zoom-niveau te wijzigen.
Voor meer informatie, zie de globale Wazeopedia pagina over Overlappende wegen.
Zorg ervoor dat je de pijlen, de Junction Arrows van de nieuwe kruisingen controleert.
Junction Arrows
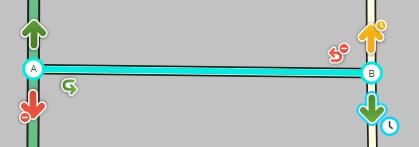
When you select a segment, you can set the turns by clicking the arrows at the junction(s) with other segments.
In General:
- A green arrow means Allowed
- A yellow arrow with a clock means it is Partially Restricted (time or vehicle-type based)
- A red arrow with the circle-slash icon means Restricted
Clicking an arrow toggles between Allowed and Restricted (or, between Partially and Fully Restricted).
NOTE: The slashed-circle icon for Restricted and clock icon for Partial turn restrictions are put in place to allow editors with various forms of color blindness differentiate between the three different types of turn arrows.
Each arrow must be set correctly for Waze to route correctly. Initial turn restrictions on roads that are imported by Waze, are set automatically by the Waze routing engine. At the moment these are called Soft turns. They are not yet confirmed manually by an editor and you can recognize them at the little question mark next to it. The soft turns can be altered by the routing engine, based on the driving activity. Manually set turns will never be altered by the routing engine. Unfortunately, both automatic and manually restricted turns are represented by red arrows and cannot be distinguished. Currently, when you use the option to enable all turns, it will not fully change the routing from automatic to manual setting, leaving possible so called RevCons. To clear these, select the junction with the mouse. Then, in the left menu pane, click the link to "Disallow all turns" and then "Allow all turns". Alternately you can use the keyboard shortcuts, by pressing the letter q to disallow all connections, followed by w to allow all connections.
See the section set allowed turns in the global wiki for more information.
Keyboard Shortcuts for junction arrowsː
- Press s to separate overlapping arrows.
- Press a to make arrows transparent or opaque, so you can see beneath them or click items under them
- Press q to disallow all turns
- Press w to allow all turns
- Press ⇧ Shift+z to toggle between seeing the turns for one segement, or seeing all restricted turns (red arrows) for all junctions in your screen. Don't forget to toggle back if actually setting the junction arrows on a segment.
Create a roundabout
- Draw single road segments that will lead to the roundabout and ensure they extend into the center of the roundabout area. Use the visual map or gps points to align the roads.
- Hover the mouse over the
 button on the toolbar at the top of the page and click "Roundabout" (Shortcut key: o).
 - Click the mouse on the map at the center of the roundabout area.
- Move the mouse cursor outside, up to the middle of where the roundabout road should be, and single-click. WME now creates the roundabout and will remove all segments within it.
- Roundabouts should not get a Streetname to enable proper routing. Enter the City name in the "Edit" menu left. Check the "None" box of the Streetname.
Roundabouts in WME will yield specific routing instructions to drivers, such as "at the roundabout, take the third exit". If those routing instructions could confuse drivers, the Roundabout tool should not be used.
Roundabouts should never be used for cul-de-sacs or other dead end streets, regardless of how round they are. A single road segment leading to a cul-de-sac should be drawn as a dead end. With very large roads it might be advisable to create a loop, but not a roundabout.
Traffic circles without roundabout signs should not be drawn as a roundabout. In some cases, a roundabout is not used even if there is a roundabout sign, to create the best possible instructions for the situation.
See also the page on roundabouts.
Create a loop road
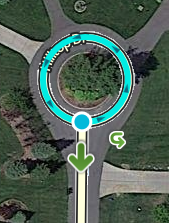
Every loop must be made up of three or more segments. Any loop that does not follow this rule can cause problems for the Waze routing server. If there is no side-street, you must insert an extra junction node along the loop.
If you have to correct a loop road with less than three segments, cut one of the looping segments somewhere, following the instructions in Cutting a segment and check the Junction Arrows.
Please note, a real loop road should only be sparsely used with care. For more information, see the article Loops in the global Wiki page Junction Style Guide.
Cutting a segment
You can cut a segment into two new segments. You can do this by adding a new segment from some random point nearby, to the point of the segment where you want to cut it. A new junction will be added. Delete the new segment just created. The newly created junction will remain and you made two new segments out of one. If you need to actually separate the road segments at that point, just relocate the end point of one of the two new segments.
Walking Trails / Pedestrian Boardwalks
Adding Walking Trails or Pedestrian Boardwalks should only be done exceptionally. Do not add any before reading the general Non-drivable roads information and detailed information and guidelines on Pedestrian Boardwalks and Walking Trails. When you have any doubt just ask your Community.
Parking lots
Parking Lots are sparsely drawn, to prevent cluttering the map. The most important thing is that people can be routed to and from a parking lot. For small Parking Lots, a single road segment often suffices. For large Parking Lots (for example at an event center) consider mapping only the following:
- Main entrances from the roads outside the parking lot
- Lanes that run along entrances of buildings
- Lanes that run along main roads outside the parking area (to separate different speed tracks)
- Large parking lot lanes that serve to get people from one area of the lot to another
Parking Lot Roads need to be defined as such in the menu pane left. They generate a large penalty to prevent thru-traffic in the navigation.
A Parking Lot Road only gets the City defined, without a street name (check the "None" box), unless it's an official street. Never use generic names, like 'Parking Theater'. For detailed information, please read the page about Parking Lot Roads in the Netherlands.
For large Parking Lots that are distinctive and significant, and for general purpose and public use, a Parking Lot Place can be drawn.
Housenumbers
Since november 2014 it is possible to search for housenumbers in the Waze database. To support this functionality, Waze imported in the Netherlands housenumber data from external sources.
When searching for an address in the Waze app or Live map, Waze will use the following order to present the results:
- Manually created housenumbers
- Google Maps database
- Imported housenumber data
Imported housenumbers can be recognized for there is no editor linked to the housenumber in the housenumber screen. For the best working of Waze follow this guideline: if you notice a wrongly positioned address/housenumber in the app or livemap, add the housenumber or correct the housenumber in the Waze Map Editor. If the housenumber looks correct, but there is no editor linked to it yet, just give it a nudge and Save. Now you should see your name linked to the housenumber when you select it. See also our Wiki page on House numbers.
Note: Be aware that, in the app, old search records should be removed to get an updated result.
Solve Map Problems (MPs) and User Requests (URs)
Solving ![]() MPs and
MPs and ![]() URs needs attention and often quite some knowledge. Unless you are sure about the problem (e.g., you are local and checked the situation), it is not advised to do this when you are a starter to WME. More information can be read in our Update requests and Map Problems pages,
URs needs attention and often quite some knowledge. Unless you are sure about the problem (e.g., you are local and checked the situation), it is not advised to do this when you are a starter to WME. More information can be read in our Update requests and Map Problems pages,
Closing a street
If you've knowledge of planned roadworks or you come across a a closed street, the best thing to do is request a closure. As a starting editor you're not yet able to set closures yourself. Requesting a closure can be done via the Slack closure channel. A closure is instantly active and is used for temporary blockades.
Another way to prevent routing going through a street is by adding a restriction. Restrictions are used for blocking a street on specific days, times or blocking specific vehicle types. Restrictions are not meant for temporary situations, like roadworks or accidents. They are really part of the map. Restriction changes need a map update, so they will take probably one or two days to become active.
How to make a permalink
The permalink icon ![]() at the right bottom of your screen has two functions:
at the right bottom of your screen has two functions:
- refresh the browser window, and
- to create Permalinks to share and communicate with other editors.
A permalink is a URL used to take you or someone else directly to a specific map location. It contains latitude, longitude, zoom level, visible layers, and optionally a junction or a place or one or more segments.
To refresh the browser and "remember" the current editing window information, simply click on the permalink icon. Any unsaved edits will be lost, and the chat window will be cleared. The current map permalink will be copied to the address bar, and may be copied for sharing with other editors.
To create a permalink without refreshing the browser, zoom and pan the map to show what you want to show. Next, hover the mouse over the ![]() permalink icon on the right side of the bottom bar until a message pops up. Then use Ctrl+C to copy the permalink. You can paste this link anywhere you need it.
permalink icon on the right side of the bottom bar until a message pops up. Then use Ctrl+C to copy the permalink. You can paste this link anywhere you need it.
To include a single place, junction, or segment in the permalink, click on it before using the permalink icon. To include several segments and/or objects, use ctrl+click (for MAC:⌘ Command+click).
Use of external resources
You, yourself have invaluable knowledge of your surroundings: this is the best free, up to date and reliable source to be used in editing the map.
Besides your own eyes you can use
- the internal Streetview that is available from the WME. Drag the lens icon from above the zoom control bottom right to the point where you want to see the street view. Beware that the situation can be changed.
- the Satellite imagery, to be enable / disabled via the layers menu. Waze uses aerial and satellite photography provided by Google.
But, be very careful using other, external sources for editing the map; some policies or conditions restrict the use or duplication of the data and could lead to a complete deletion of the country map. Read more on the Resources page.
De volgende stap
- Voor het vervolg op deze Quick-Start Guide zie de Advanced Guide
- Handzame tips en beschrijvingen van vaak bij starters voorkomende problemen zijn beschreven in Verbeter je vaardigheden.
- Vergeet niet je aan te sluiten bij je collega Wazers. Zie zullen blij zijn je te ontmoeten!

