Geen bewerkingssamenvatting |
Geen bewerkingssamenvatting |
||
| Regel 33: | Regel 33: | ||
# When finished, double-click (or shift-click) the last point to end the segment. | # When finished, double-click (or shift-click) the last point to end the segment. | ||
# Select the segment again, and fill in the details of the segment in the menu pane on the left. | # Select the segment again, and fill in the details of the segment in the menu pane on the left. | ||
'''Rules for creating roads:''' | <big>'''Rules for creating roads:'''</big> | ||
* Each segment that is added must have a Country, City, and Street name, under the "Edit" link left. If there is no City and/or Street name available, then the "None" box(es) must be selected, or the segment will not be used in navigation. In the editor, you will see a red outline around the segment. | * Each segment that is added must have a Country, City, and Street name, under the "Edit" link left. If there is no City and/or Street name available, then the "None" box(es) must be selected, or the segment will not be used in navigation. In the editor, you will see a red outline around the segment. | ||
* Be sure the road actually exists before creating it. | * Be sure the road actually exists before creating it. | ||
* '''[EDIT: add instruction video]''' | * '''[EDIT: add instruction video]''' | ||
For more detail on creating road segments, see Creating and editing road segments. '''[EDIT: add link]''' | |||
Versie van 10 nov 2017 13:12
| If you are looking for a full version of the BeNeLux Wiki, click here. |

| Benelux Announcement: The information on these pages is adapted to the situation and working of Waze in the countries of the BeNeLux. At the top of the page you can select the language of your choice. Pages that are not updated within the last half year may be out of date. Please do not change anything without consulting the local team. Any questions, remarks or ideas are welcome in this forum. |
Welcome Editor!
This page provides the basics to start editing the Waze Map. Because Waze is a navigation tool and not a topographic map, some things are drawn differently than expected. Our advice is, after reading this page, to choose one type of edit and first familiarize yourself with all aspects of that edit. Otherwise, you might as well get overfed with information. Your community is happy to help you make your edits work.
How To Get To The Waze Map Editor (WME)
You can access the Waze Map Editor following those steps:
- Go to www.waze.com
- Click 'Live Map'.
- Search for your location.
- Click 'Edit the map' in the lower left corner of the screen.
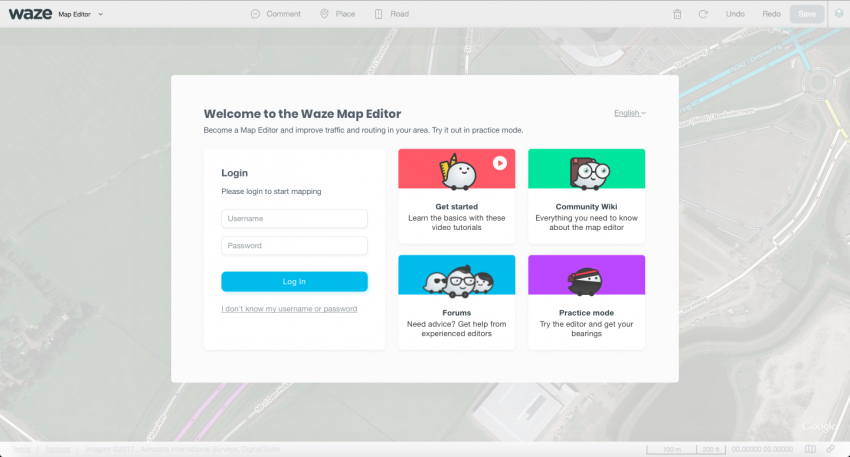
Or, go directly to www.waze.com/editor. You will see the following page:

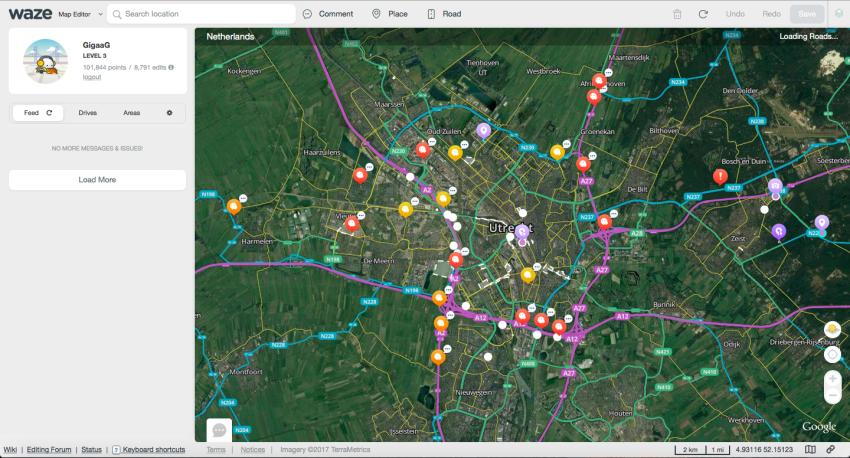
Log in with your username and password you use in the Waze Client App to access the editor. After logging in, you will see the following screen:

You are now ready to edit! For a more detailed instruction of using the WME, see the global Wazeopedia page: Waze Map Editor
Start In Practice Mode
Before editing the map for real, you may first want to practice editing. The Waze Map Editor has a Practice mode in which you can perform nearly every action available when logged into the Editor, except that you cannot save any changes. Go to the WME and choose Practice Mode. If you are already logged into WME, log out first to be able to enter Practice Mode. In order to save changes, you must log in. Practice mode is helpful to new and existing editors and should be used to try out new or complicated edits before executing them. More information can be found on Practice Mode.
Editing The Map
Most starting editors at first try to match the map of Waze perfectly to the satellite image. They split roads, add bicycle paths and walking trails, make the roads very fluently and draw detailed places. However, Waze is NOT a topografical map, but a navigation system that routes you to your destination in the best/fastest way. Therefore, keep the Waze map simple: The lesser the detail, the clearer the map, lesser data use, faster calculations, and easier maintainance. With that in mind, let's start edit the map!
Create A Road
- Hover the mouse over the afbeelding button on the toolbar at the top of the page and click "Road". (Shortcut key: i; Roundabouts are explained in another section) [Edit: add links]
- Click the mouse on the map at the point where you want to start the new road segment.
- Move the mouse cursor along the path of the road and click the mouse to add a geometry node for each point that changes direction along the road. [EDIT: add links]
- When finished, double-click (or shift-click) the last point to end the segment.
- Select the segment again, and fill in the details of the segment in the menu pane on the left.
Rules for creating roads:
- Each segment that is added must have a Country, City, and Street name, under the "Edit" link left. If there is no City and/or Street name available, then the "None" box(es) must be selected, or the segment will not be used in navigation. In the editor, you will see a red outline around the segment.
- Be sure the road actually exists before creating it.
- [EDIT: add instruction video]
For more detail on creating road segments, see Creating and editing road segments. [EDIT: add link]