Map Editor Tool Bar
At the top of the Waze Map Editor you will see the main tool bar. It includes the primary control buttons for the editor.
Search box

In the wide search box, you can enter an address, city, state, country, landmark, point of interest, or a combination of those. After hitting Enter you will either be taken to the only result, or be given a list of matches from which to select.
For example, entering "757 Mohawk St, Columbus, OH" will center the map and drop a search marker directly on that address.

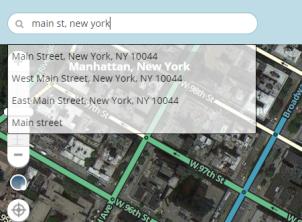
However, a search for "main st, new york" is less specific and will result in a list of matches. Click on one to choose it.
Draw Places Menu

Hover over this button to show place categories. Choose one and click on the map to add it. This will add a point place. Use the left pane to change it to an area and to change other information about the place. For an place, use geometry nodes of the place to change its shape.
Draw segments Menu

Shortcut keys: i or o
Hover over this button to choose between a single segment and a roundabout.
- i (a straight segment)- Road. Click on the map to start, click to add a geometry node. Double click to end.
- o (a circle)- Roundabout. Click on the map at the center of the roundabout. Drag a circle of the correct size. Click to end the roundabout.
See the Editing Manual Quick Start Guide for more information.
Save Button

The Save button serves two purposes: 1) it displays the current number of changes pending to be saved, and 2) when clicked, it saves all the current changes you have made.
As you make changes, the counter in the Save button increases. The number in the icon is shown to red as a warning that many unsaved changes may be difficult to save if there is a single error among the changes. (This counter is the number of changes you've made which can be undone, NOT the number of edits you get credit for.)
When the button is clicked (or the shortcut key used), WME sends all of the current changes to the waze server. If there is any problem saving changes, WME will receive information from the server and attempt to give you a detailed error message and a suggestion to fix it. The map view will typically try to show the error area highlighted in a bright circle.
Once the save operation completes successfully, you cannot Undo previous changes with the Undo button.
Undo Button

Shortcut key: Ctrl+z
The Undo button will undo unsaved successive previous changes with each click.
| IMPORTANT: Once the Save button is clicked and the save operation is complete, the Undo button has no affect on previous changes. |
A change can be deleting a geometry node from a segment or renaming a landmark. It can also be a change to multiple objects at once. For example, if you multi-select 25 street segments to change them from No Entrance to 2-way, that is considered a single change. Therefore, one click on Undo will undo that change for all 25 segments.
Redo Button

Shortcut key: Ctrl+Shift+z
The Redo button will re-apply any changes which have been recently undone with the Undo button.
Delete button

Shortcut key: Delete (Del)
The Delete (trashcan) button will delete, or trash, any currently selected objects. If you have multiple objects selected, you will be prompted to confirm the multiple deletion. The only object you can currently multi-select is segments.
Objects are not actually deleted until the Save button is clicked. Once the save button is pressed, you cannot Undo any edits or deletes.
Layers

On the right-side of the toolbar, you will see this icon: ![]()
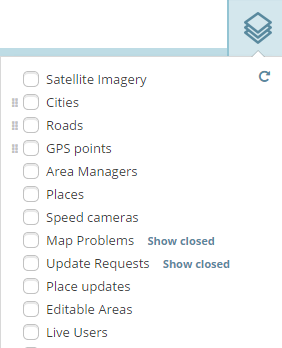
When clicked, it expands to display the layers or object types which are available for display on the main map. When the box next to the layer name is checked, then that layer is active and being displayed. There is a default shortcut key defined for each layer, and to make it easy to remember, with two exceptions: The shortcut is Shift+<first letter of layer name>. The two exceptions are the satellite/aerial imagery, which uses the letter i as the shortcut key for Imagery, and Places which uses the letter L because it was previously called Landmarks.
Refresh or Reload Layers
![]()
The small curved arrow at the top right of the Layers list ![]() will reload all layers in the current view without reloading the whole page (excluding Satellite Imagery, Cities, and GPS layers). This is a great way to see changes recently made by another editor in the area without losing the Chat history.
will reload all layers in the current view without reloading the whole page (excluding Satellite Imagery, Cities, and GPS layers). This is a great way to see changes recently made by another editor in the area without losing the Chat history.
Reorder

The six small dots to the left of a layer selector box is a drag handle which enables those layers to be reordered changing the visibility of one layer above another. Only a few layers can be reordered. PLEASE NOTE: The layer order is reversed so layers at the bottom of the list appear above layers higher up in the list. Therefore Satellite Imagery will always appear below all other layers.
Satellite Imagery
Waze uses aerial and satellite photography provided by Google.
Cities
City boundaries as defined by segments assigned to that city are shown in different colors. This layer is helpful in finding segments which are set to the wrong city. Until an area is heavily edited an updated, some city boundaries are likely to be overlapping or appear to be unassociated with any segments.
Changing the name of the city for a road is done through the WME interface documented in segment edit detail. If after fixing the city names you still have incorrect city boundaries, review the article on Updating the city layer.
Roads
Roads are all of the streets, alleys, highways, and freeways which make up the drivable street system in Waze. Depending on the zoom level, some street types are not displayed so that the map is not too cluttered.
GPS points
This layer will show tracks from Waze users as they drive with Waze running. Waze records and plots the GPS coordinate of drivers. This layer is useful for relatively accurate placement of new or moved roads when aerial photography is not yet updated. GPS points appear in the map editor as colored arrows. The direction of travel for a GPS point determine its color, so that all drivers going the same direction will show their points in the same color. This makes it easier to determine errant GPS points, or where a road on the map doesn't follow the actual path of vehicles.
Area Managers
The Area Managers layer shows overlapping colored, named rectangles. These areas represent the areas those users have Area Manager permissions. This layer allows you to identify a user you may wish to send a PM in the forums about a specific issue you noticed in their area, but do not have rights to fix.
Places
Places are also known as POIs (Points of Interest). These can really be just about anything, but tend to be things like parks, gas stations, cemeteries, transit stations, etc. There are two types of Places: Area and Point. Point Places are for most small business, shops, etc. Area Places are for large stores, malls, parks, etc.
See Places for more information on this topic.
(Speed) Cameras
Speed cameras, red-light cameras and dummy cameras are shown on this layer. Drivers report camera location and type, and a map editor is required to confirm the existence of the camera, precise location and direction the camera is point before it will appear on the client. Confirmed cameras will pop up a visual and audible alert in the Waze app when approaching a speed or red light camera.
See Cameras for more information.
Map Problems

The Waze servers are constantly analyzing driver's GPS tracks to determine when there might be a problem with the map and uses the Problems layer to alert the editors. Some types of problems tracked are missing roads, incorrect turns allowed at intersection, wrong direction of road.
You can toggle visibility of closed Map Problems by using the "Show/Hide closed" link next to the Map Problems text.
See Map problems for more information.
Update Requests

These are user-submitted map issues while on the road or from LiveMap. This marker shows the location the user reported the issue from. The user's driven route for a distance before and after the reported location will be shown in bright green. If Waze was in navigation mode at the time of the report, the requested route for a distance before and after the reported location will be shown in purple, with markers along the route with the turn direction given to the user.
You can toggle visibility of closed Update Requests by using the "Show/Hide closed" link next to the Update Requests text.
See Update requests for more information.
Place updates
Shortcut key: Shift+p
The Place Updates layer shows Place Update Requests (PURs) submitted by drivers and beginning editors. When an untrusted driver or editor creates a new place or makes changes to an existing place, a Place Update Request is created. Editors of rank 2 or higher decide whether to accept each request. The most recent requests are a pale pink. Older requests are darker. Accepted but not-yet-saved requests are green.
See Place Updates (Moderation) for more detail.
Editable areas
Where you can edit is determined primarily by where you have driven. Edit rights are initially granted within a one-mile radius of where you have driven with Waze running. Your editable area is shown in lighter-colored areas surrounded by a black border. Users who are Area Managers will also see their managed areas in a colored highlighted area. See Editable area for more information.
Live Users
The Live Users layer shows other map editors with the map editor icon above. Editors' locations are shown in real-time.
Road Closures
The Road Closures layer shows a closure symbol on any segment that has a temporary road closure. If the closure is in only one direction, there will be an arrow nearby to show the direction of closure.


