(Page creation) |
mNo edit summary |
||
| Line 3: | Line 3: | ||
==Starters sheet== | ==Starters sheet== | ||
'''Start editing in 5 steps''':<br /> | |||
<br /> | |||
1. '''Start the map editor''': [https://www.waze.com/editor?env=row https://www.waze.com/editor?env=row]. <br /> | |||
<br /> | |||
2. '''Go to the location you want to start editing''' | |||
<table><tr><td width=30% valign=top> | |||
Or via the area where you are allowed to edit: click on the '''Areas tab''' on the left hand side of the editor screen and next click on the area<br /> | |||
Or via the routes you have droven lately: click on the '''Drives tab''' on the left hand side of the editor screen and click on one of the drives.<br /> | |||
<br /> | |||
Move the map to the location where you want start editing bij moving the mouse while keeping the left mouse button pressed. | |||
</td><td valign=top> | |||
[[File:Wme-areas-tab.png|250px]] | |||
</td><td valign=top> | |||
[[File:Wme-drives-tab.png|250px]] | |||
</td></tr></table> | |||
{{Clear}} | |||
<br /> | |||
{{Clear}} | |||
3. [[File:Wme-road-menu.png|right|125px]] '''Add a missing road''' bij clicking on the '''Road menu''' at the top and selecting Road.<br /> | |||
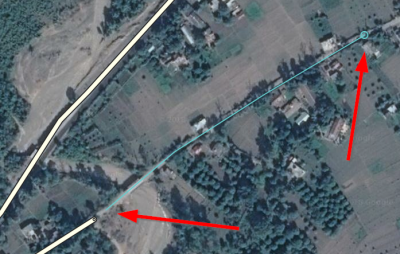
* Move the little <font color=blue>blue circle</font> to the starting point on the new road and click. | |||
* Move the cursor and click on each corner of the new road. | |||
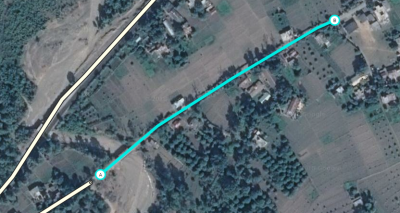
* Double click to finish the road drawing. The <font color=blue>thin blue line</font> becomes a thick line with A and B as starting and ending points. | |||
<br /> | |||
<table> | |||
<tr><td valign=top> | |||
[[File:Wme-drawing-road-1.png|400px|during the drawing of a new road from left to right]] | |||
</td><td valign=top>During the drawing of a new road</td></tr> | |||
<tr><td valign=top> | |||
[[File:Wme-drawing-road-2.png|400px|after the double click to finish the drawing]] | |||
</td><td valign=top>After the double click to finish the drawing</td></tr> | |||
<tr><td valign=top> | |||
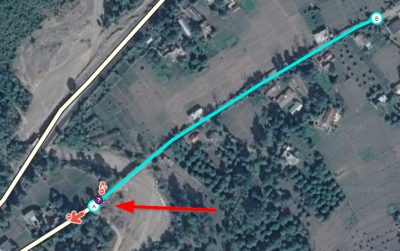
[[File:Wme-drawing-road-3.png|400px|start connecting the new road]] | |||
</td><td valign=top>Start connecting the new road segment.<br /> | |||
<br /> | |||
Drag the end of the new road to the existing road.<br /> | |||
<br /> | |||
The <font color=red>red arrow</font> mean that driving from this segment to the existing road is not (yet) allowed.<br /> | |||
<br /> | |||
The little <font color=red>red U-turn arrow</font> mean that turning on the newly made road is not (yet) allowed. | |||
</td></tr> | |||
</table> | |||
{{Clear}} | |||
__NOTOC__ | __NOTOC__ | ||
{{Bottomline}} | {{Bottomline}} | ||
Revision as of 09:12, 19 May 2018
New India Wiki is being built, For now, please see the pages about Waze in India in the old Wiki.
Starters sheet
Start editing in 5 steps:
1. Start the map editor: https://www.waze.com/editor?env=row.
2. Go to the location you want to start editing
|
Or via the area where you are allowed to edit: click on the Areas tab on the left hand side of the editor screen and next click on the area |
3.

Add a missing road bij clicking on the Road menu at the top and selecting Road.
- Move the little blue circle to the starting point on the new road and click.
- Move the cursor and click on each corner of the new road.
- Double click to finish the road drawing. The thin blue line becomes a thick line with A and B as starting and ending points.
| During the drawing of a new road | |
| After the double click to finish the drawing | |
| Start connecting the new road segment.
|


