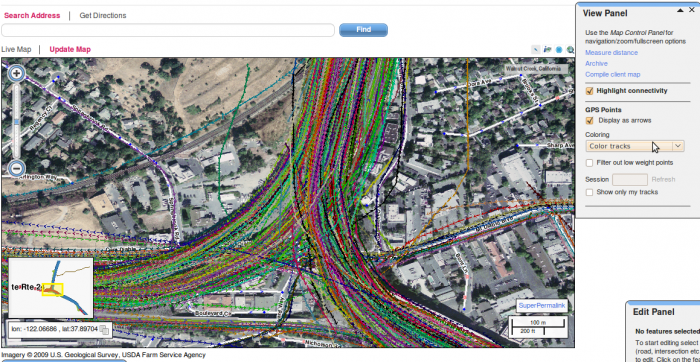
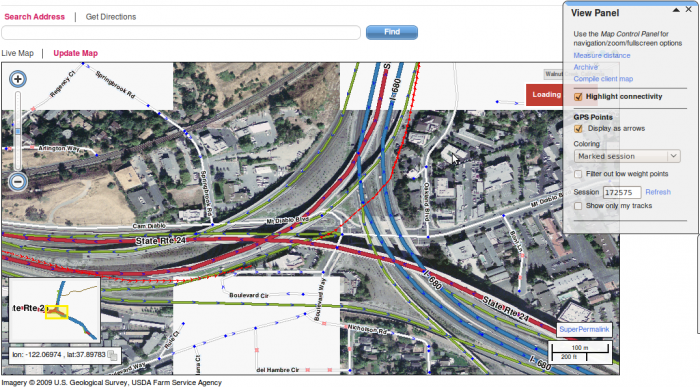
A térképen a legtöbb változtatás automatikusan történik az alkalmazás által. Ez úgy történik, hogy először a meglévő utakat és a felhasználók által bejárt útvonalakat egymáshoz rendeli, majd az úthoz rendelt GPS nyomvonalak alapján megváltoztatja a térképet (például az utak nyomvonalát vagy a megengedett haladási irányt).
A merger hibák a felhasználók által bejárt útvonalak adatainak és a térkép útjainak különbségéből származik. Például amikor a GPS nyomvonalak eltérnek a térképen szereplő út nyomvonalától, az adott helyeken megjelennek merger hibajelzések.
A merger hibájelzések széleskörű nyomozást igényelnek, mind a térkép, mind a felhasználó által bejárt útvonal - ami a hibát okozza - tekintetében. A felhasználó által bejárt útvonal kimerítő elemzése szükséges, még messzebre az adott hiba helyétől is ahhoz, hogy végül megértsük mi is okozza a hibát. Első ránézésre szinte mindig úgy tűnik, hogy nincs semilyen hiba, de a környék részletesebb elemzésével kiderül, hogy a hiba hol is van tulajdonképpen, akár a jelzett pontol távol.
Ugyanakkor a merger hibákat nem mindig a hibás térkép okozza. Sokszor a hibát az okozza, hogy a telefon GPS részében van valamilyen hiba, zavar volt a GPS jel vételében, vagy a GPS pontatlan.
Szükséges nagyon körültekintően elemezni a hibát mielőtt megállapíthatnánk, hogy a GPS pontok és az utak nyomvonalának eltérése a telefon GPS pontatlanságából vagy a térkép nyomvonalának helytelenségéből adódik.
A hibára kattintva a térképszerkesztőben megjelennek a felhasználó útvonalának azon pontjai, amik a hibát okozzák. A hozzá tartozó részletek megjelennek az edit panel-ben a megoldást segítő eszközökkel együtt. Továbbá sárgával kiemelődik két konkrét útszakasz a térképszerkesztőben: Previous segment és Next segment (Előző szegmens és Következő szegmens).
Ez az a két szegmens amiket a rendszer valamilyen oknál fogva nem tudott hozzácsatolni és hozzárendelni a GPS nyomvonalhoz.
A térképszerkesztőben megjelenő hiba pontos típusának leírása az edit panel-ben meg fog jelenni amikor kiválasztásra kerül.
Több megoldás létezik egy-egy hibára a térképtől és a felhasználó által rögzített nyomvonal adataitól függően.
Tools to resolve Merger problems:
- View relevant session (in the edit panel) – Choosing this option will show on the map the relevant driving session which caused the anomaly. Viewing the relevant session is a primary and necessary tool to fully understand the origin of the problem and to resolve it. Note that the driving session appears as GPS points on the map. In order to see the GPS points it is sometimes necessary to zoom in on the map (the points only appear from a certain zoom level).
- View archived routes (in the edit panel) – Choosing this option will create a list which includes all of your driving sessions in the problem's area. In case you didn't drive in this area, the View archived routes won't show any results.
- GPS points (in the view panel) – In order to view the GPS points on the map, you need to activate the 'GPS points' layer. After this layer is activated, different view options will appear in the bottom of the edit panel.
It is recommended to click on the Display as arrows check box in order to view the GPS points with their driving directions.
- Color tracks - The GPS points will appear in different colors for each user's track.
- Color by azimuth - The GPS points will appear in different colors for different azimuths.
- Marked session- will show the specific driving session as red arrows. In other cases, after clicking on a merger problem, the driving session that caused the anomaly will appear as red arrows as well.
After the problem has been checked with the relevant tools, if the problem does not result from the map but from a GPS deviation, update the problem as follows:
- Make sure that the problem doesn't require a correction.
- Select the problem, its details will appear in the edit panel.
- At the bottom of the edit panel will appear the word resolve with options to resolve the problem.
- From the options, select Not a problem and confirm.
Problem number 50: Unable to merge road geometry
This problem occurs when for some reason the system cannot connect between the Previous segment and the Next segment (the two highlighted segments when the problem is chosen.) Many times this problem is created when the turn between two segments is too sharp, and the system fails to connect the two. In other cases, the problem is due to the fact that between the two highlighted segments, there's a segment with a wrong direction that prevents navigation on the specific road.

Solution:
- Click on the problem and then view the relevant session.
- Examine the session's driving direction according to the GPS points and check whether the driving is allowed by the current road directions in the map (the roads have the same direction.) Make sure that the roads are connected by checking the check box highlight connectivity in the view panel.
- If one road is incorrect, select the road in order to change its direction by clicking it.
- In the edit panel, select edit road details.
- On the direction option, change the road to the desired direction and confirm the change.
- Connect the road to the other roads on both sides by selecting the first road (by the order of traffic direction), holding the Ctrl key and selecting the next road (again, by the order of traffic direction).
- In the edit panel select connect roads by order of selection.
- Repeat this procedure on all road segments that are not connected to ensure proper routing.
- When all the road directions are correct and connected, select the problem on the map once again to view the information on the problem in the edit panel.
- On the bottom of the edit panel below the resolve option, there are 3 options to resolve the problem.
- From the 3 options select fixed and confirm.
Problem number 51: unable to connect segments
The problem occurs when the program tries to find a continuous path of navigation and encounters a missing segment, a segment which is too short or a segment which geometry won't allow the navigation.
By viewing the previous segment and the next segment, we will be able to see which road segment creates the anomaly.
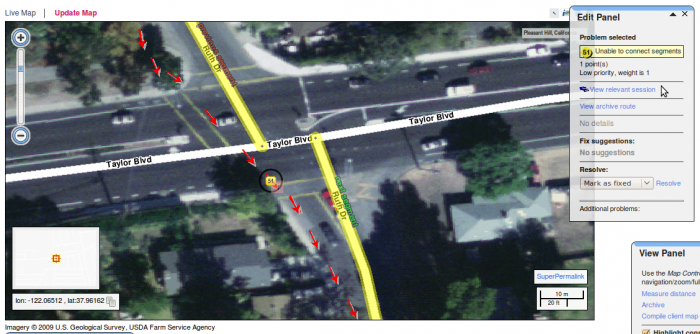 Solution:
- Click on the problem and then view the relevant session.
- Inspect the driving session and check the of the continuity of the segments. If the segments do not match the track, you will be required to change them according to actual driving track (based on the GPS points).
- Select the segment whose shape does not match the track. First disconnect it from the other segments in order to edit it properly. To disconnect a segment from the node it is attached to, select the segment itself, hold the Ctrl key and select the node it's connected to.
- in the edit panel select the option disconnect road from node and confirm.
- If necessary create a new node by selecting the relevant segment, and in the edit panel select split road at a point, click on the spot where you want to create a node and confirm.
- Connect the two segments according to the direction of traffic. Connect the road to the other roads on each end – select the first road (by the order of traffic direction), hold the Ctrl key and select the next road (again,by the order of traffic direction). In the edit panel select connect roads by order of selection.
- When all the road directions are correct and properly connected, select the problem on the map once again in order to view the information on the problem in the edit panel.
- On the bottom of the edit panel, below the resolve option – there are 3 option to resolve the problem.
- From the 3 options select fixed and confirm.
Problem number 52 – missing road when GPX not in valid mode.
This problem occurs when the driving session's track is far or its shape is different from road segments on the map, or in some cases, there is no road where the session's track passes. This means that the system suspects a road is missing from the map, but the GPS track was not received in recording mode. However, most of the time the problem arises due to an error or inaccuracy of the GPS component of the cell phone.
In this situation the session's GPS points will seem to match the road geometry but will appear distant from the road it “supposed” to be on.
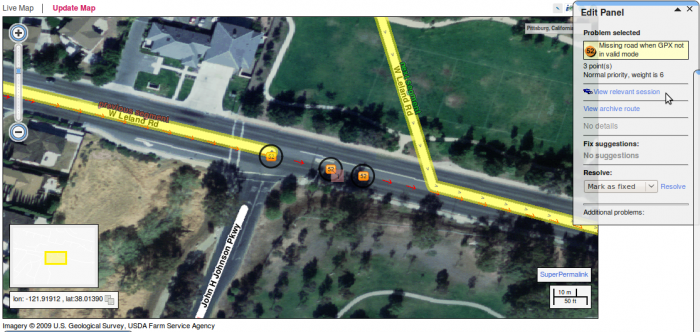 Solution:
If your conclusion is that a road is missing, and it is not a deviation of the GPS, you need to create a new road.
- Make sure that no element is marked on the map.
- In the edit panel select add new feature.
- Select add road.
- Click on the map at the point you want to start sketching the new road. Every additional click will add a joint to the road's shape. To end the sketch of the road just double click. Note that you cannot sketch a road over an area that doesn't have GPS tracks.
- On the edit panel you will have to edit the road's information in order to create it. The information that needs to be edited is:
- Road type
- City (in case it doesn't appear automatically)
- Street ( the street's name)
- Direction of driving.
- After filling out the information, confirm by clicking on create new road. In some cases you will need to confirm the name of the road again.
- If needed, edit the road geometry by clicking on edit road geometry on the edit panel.
- Connect the new segment according to direction of traffic. Connect the road to the other roads on both ends by selecting the first road (by the order of traffic direction), hold the Ctrl key and select the next road (again,by the order of traffic direction). In the edit panel select connect roads by order of selection.
- select the problem on the map once again in order to view the information on the problem on the edit panel.
- On the bottom of the edit panel, below the resolve option – there are 3 option the resolve the problem.
- From the 3 options select fixed and confirm
Problem number 58 – colliding alternate resolve paths.
This problem arises when the program can match the driving session to two existing segments, but one of the segments is problematic or incorrect.
A common reason for the creation of this problem is when a road “hides” another road underneath it, when in fact there is only one road in reality. This situation creates an anomaly that causes one route of driving over two roads at once.
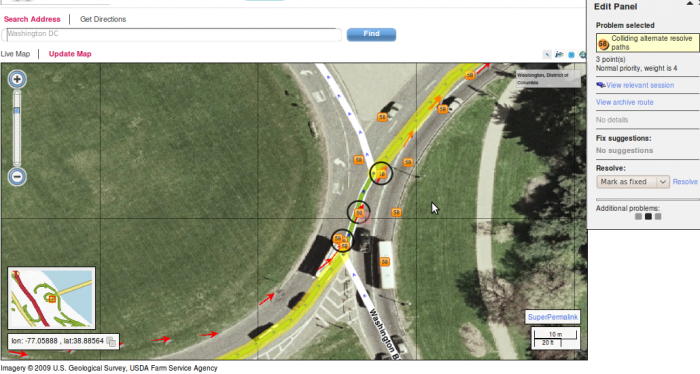 Solution:
- Click on the problem and than view the relevant session. Examine the appropriate route to the same track by reference to - Previous Segment and Next segment.
- After finding the correct route, identify the incorrect segments that could create a problem with routing.
- In a situation where the right track and the wrong track are overlapping (so that one hides the other):
- Select the relevant segment. on the edit panel select edit road geometry.
- Change the road's shape in order to reveal the road that is underneath it.
- Delete the unnecessary road.
- In other cases, make sure that the segments are connected to each other by checking the connectivity with the highlight connectivity tool. Also, check that the shape of the road is consistent with the aerial photo that appears in the background of the map and allows continuous driving, without sharp angles.
To change the road's shape, select edit road geometry in edit panel.
In addition, make sure that the arrows that appear on the road correspond to the direction of traffic in reality. To change the direction, select edit road details in the edit panel and change the direction of the road. - Select the problem on the map once again in order to view the information on the problem on the edit panel.
- On the bottom of the editing panel notice the resolve option – below that there are 3 option to resolve the problem.
- From the 3 options select fixed and confirm
Problem number 59 – unmatched resolve paths.
This problem occurs when the program matches the session with an incorrect route on the map.
Possible causes of this problem is when segments on the road are not connected properly, when the directions are not set properly, and other scenarios.
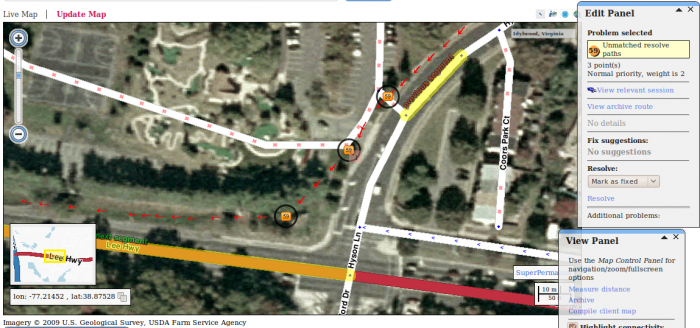 Solution:
To resolve this problem, first you must understand what caused the anomaly that prevented the correct route from being matched, and locate the point where navigation is not proper.
- Select a problem, and select view relevant session. Two segments will be highlighted in yellow: previous segment and next segment. These segments, in case of this problem, indicate the connection where routing is not possible. Deviations of GPS tracks that do not allow continuous routing lead the program to choose the closest possible segment incorrectly.
- Identify the road segments where the selected track is not possible to route on, and which led the program to choose an incorrect route - and correct these segments.
- You should check that the shape of the road is consistent with the aerial photo that appears in the background and allows continuous driving, without sharp angles. To change the road shape, select the road segment and in the edit panel select edit road geometry.
- Make sure the arrows that appear on the road map correspond to the direction of traffic reality. To change the direction, select edit road details in the edit panel and change the direction of the road.
- Select the problem on the map once again in order to view the information on the problem on the edit panel.
- On the bottom of the editing panel notice the resolve option – below that there are 3 option to resolve the problem.
- From the 3 options select fixed and confirm
Problem number 60 - Route disconnected
At some occasions the GPS session cannot be matched to a complete route on the map as some roads along the route are disconnected.
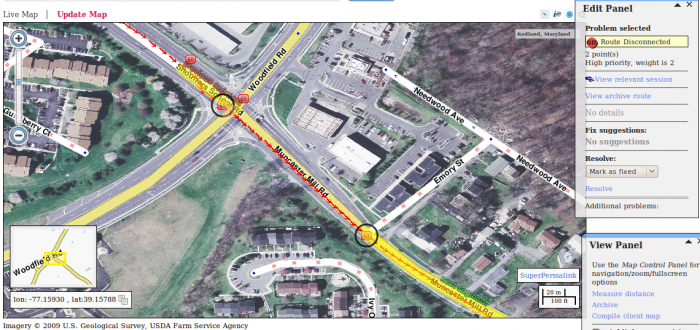 Solution:
- Select the problem and select view relevant session. The problem may appear on a wide range so the map will be shown on a greater zoom level than usual. In certain situations, it might appear unusually large number of problems number 60 – where each problem indicates that there is a disconnection along the route. Keep in mind that in order to see the actual GPS points you might need to zoom in.
- Check all of the route to ensure that the road segments are connected to each other by checking the Highlight connectivity.
- Check that the shape of the road is consistent with the aerial photo that appears in the background and allows continuous driving, without sharp angles. Change the shape of the road if needed by selecting the Edit road geometry in the edit panel.
- Make sure that the arrows that appear on the map correspond to the direction of traffic in reality. To change the direction, select edit road details in the edit panel and change the direction of the road.
- Select the problem on the map once again in order to view the information on the problem on the edit panel.
- On the bottom of the editing panel notice the resolve option – below that there are 3 option to resolve the problem.
- From the 3 options select fixed and confirm.
Most map updates are done automatically by the program itself. This is done by matching users' driving sessions to the existing road map and updating the map (shape of the road or direction for example) according to the GPS tracks of anonymous users.
Merger problems arise from a discrepancy between the data gathered from the driving sessions and the existing map. For example, when the GPS tracks deviate from the road as it is currently mapped, merger problems will appear at relevant points on the map.
Merger problems require deep examination of both the map and the driving session that created the problem. The driving session should be examined carefully, even beyond the specific point of the problem – in order to fully understand what made the problem appear. At first glance it will often seem that there is no problem but a deeper investigation of the whole area in the map will eventually find the source of the problem away from the apparent position.
Note that merger problems do not always result from an inaccurate map. Many times an error is caused by deviations, disturbances and errors of the GPS component in the phone.
It is necessary to diagnose the problem well before deciding if the off track GPS points are due to deviations from the roads on the map or from an inaccurate GPS reading of the phone.
Clicking the problem will show the relevant points from the session that caused the problem. The relevant details will appear in the edit panel with helpful tools to resolve it. In addition, two specific road segments will be highlighted in yellow on the map: Previous segment and Next segment.
These two segments are the segments which the system could not connect and match to the GPS track for some reason. The type of the problem which appears on the map will be described in the edit panel after the specific problem has been chosen.
There are several solutions for each problem, depending on the data from the map and from the session.
Tools to resolve Merger problems:
- View relevant session (in the edit panel) – Choosing this option will show on the map the relevant driving session which caused the anomaly. Viewing the relevant session is a primary and necessary tool to fully understand the origin of the problem and to resolve it. Note that the driving session appears as GPS points on the map. In order to see the GPS points it is sometimes necessary to zoom in on the map (the points only appear from a certain zoom level).
- View archived routes (in the edit panel) – Choosing this option will create a list which includes all of your driving sessions in the problem's area. In case you didn't drive in this area, the View archived routes won't show any results.
- GPS points (in the view panel) – In order to view the GPS points on the map, you need to activate the 'GPS points' layer. After this layer is activated, different view options will appear in the bottom of the edit panel.
It is recommended to click on the Display as arrows check box in order to view the GPS points with their driving directions.
- Color tracks - The GPS points will appear in different colors for each user's track.
- Color by azimuth - The GPS points will appear in different colors for different azimuths.
- Marked session- will show the specific driving session as red arrows. In other cases, after clicking on a merger problem, the driving session that caused the anomaly will appear as red arrows as well.
After the problem has been checked with the relevant tools, if the problem does not result from the map but from a GPS deviation, update the problem as follows:
- Make sure that the problem doesn't require a correction.
- Select the problem, its details will appear in the edit panel.
- At the bottom of the edit panel will appear the word resolve with options to resolve the problem.
- From the options, select Not a problem and confirm.
Problem number 50: Unable to merge road geometry
This problem occurs when for some reason the system cannot connect between the Previous segment and the Next segment (the two highlighted segments when the problem is chosen.) Many times this problem is created when the turn between two segments is too sharp, and the system fails to connect the two. In other cases, the problem is due to the fact that between the two highlighted segments, there's a segment with a wrong direction that prevents navigation on the specific road.

Solution:
- Click on the problem and then view the relevant session.
- Examine the session's driving direction according to the GPS points and check whether the driving is allowed by the current road directions in the map (the roads have the same direction.) Make sure that the roads are connected by checking the check box highlight connectivity in the view panel.
- If one road is incorrect, select the road in order to change its direction by clicking it.
- In the edit panel, select edit road details.
- On the direction option, change the road to the desired direction and confirm the change.
- Connect the road to the other roads on both sides by selecting the first road (by the order of traffic direction), holding the Ctrl key and selecting the next road (again, by the order of traffic direction).
- In the edit panel select connect roads by order of selection.
- Repeat this procedure on all road segments that are not connected to ensure proper routing.
- When all the road directions are correct and connected, select the problem on the map once again to view the information on the problem in the edit panel.
- On the bottom of the edit panel below the resolve option, there are 3 options to resolve the problem.
- From the 3 options select fixed and confirm.
Problem number 51: unable to connect segments
The problem occurs when the program tries to find a continuous path of navigation and encounters a missing segment, a segment which is too short or a segment which geometry won't allow the navigation.
By viewing the previous segment and the next segment, we will be able to see which road segment creates the anomaly.
 Solution:
- Click on the problem and then view the relevant session.
- Inspect the driving session and check the of the continuity of the segments. If the segments do not match the track, you will be required to change them according to actual driving track (based on the GPS points).
- Select the segment whose shape does not match the track. First disconnect it from the other segments in order to edit it properly. To disconnect a segment from the node it is attached to, select the segment itself, hold the Ctrl key and select the node it's connected to.
- in the edit panel select the option disconnect road from node and confirm.
- If necessary create a new node by selecting the relevant segment, and in the edit panel select split road at a point, click on the spot where you want to create a node and confirm.
- Connect the two segments according to the direction of traffic. Connect the road to the other roads on each end – select the first road (by the order of traffic direction), hold the Ctrl key and select the next road (again,by the order of traffic direction). In the edit panel select connect roads by order of selection.
- When all the road directions are correct and properly connected, select the problem on the map once again in order to view the information on the problem in the edit panel.
- On the bottom of the edit panel, below the resolve option – there are 3 option to resolve the problem.
- From the 3 options select fixed and confirm.
Problem number 52 – missing road when GPX not in valid mode.
This problem occurs when the driving session's track is far or its shape is different from road segments on the map, or in some cases, there is no road where the session's track passes. This means that the system suspects a road is missing from the map, but the GPS track was not received in recording mode. However, most of the time the problem arises due to an error or inaccuracy of the GPS component of the cell phone.
In this situation the session's GPS points will seem to match the road geometry but will appear distant from the road it “supposed” to be on.
 Solution:
If your conclusion is that a road is missing, and it is not a deviation of the GPS, you need to create a new road.
- Make sure that no element is marked on the map.
- In the edit panel select add new feature.
- Select add road.
- Click on the map at the point you want to start sketching the new road. Every additional click will add a joint to the road's shape. To end the sketch of the road just double click. Note that you cannot sketch a road over an area that doesn't have GPS tracks.
- On the edit panel you will have to edit the road's information in order to create it. The information that needs to be edited is:
- Road type
- City (in case it doesn't appear automatically)
- Street ( the street's name)
- Direction of driving.
- After filling out the information, confirm by clicking on create new road. In some cases you will need to confirm the name of the road again.
- If needed, edit the road geometry by clicking on edit road geometry on the edit panel.
- Connect the new segment according to direction of traffic. Connect the road to the other roads on both ends by selecting the first road (by the order of traffic direction), hold the Ctrl key and select the next road (again,by the order of traffic direction). In the edit panel select connect roads by order of selection.
- select the problem on the map once again in order to view the information on the problem on the edit panel.
- On the bottom of the edit panel, below the resolve option – there are 3 option the resolve the problem.
- From the 3 options select fixed and confirm
Problem number 58 – colliding alternate resolve paths.
This problem arises when the program can match the driving session to two existing segments, but one of the segments is problematic or incorrect.
A common reason for the creation of this problem is when a road “hides” another road underneath it, when in fact there is only one road in reality. This situation creates an anomaly that causes one route of driving over two roads at once.
 Solution:
- Click on the problem and than view the relevant session. Examine the appropriate route to the same track by reference to - Previous Segment and Next segment.
- After finding the correct route, identify the incorrect segments that could create a problem with routing.
- In a situation where the right track and the wrong track are overlapping (so that one hides the other):
- Select the relevant segment. on the edit panel select edit road geometry.
- Change the road's shape in order to reveal the road that is underneath it.
- Delete the unnecessary road.
- In other cases, make sure that the segments are connected to each other by checking the connectivity with the highlight connectivity tool. Also, check that the shape of the road is consistent with the aerial photo that appears in the background of the map and allows continuous driving, without sharp angles.
To change the road's shape, select edit road geometry in edit panel.
In addition, make sure that the arrows that appear on the road correspond to the direction of traffic in reality. To change the direction, select edit road details in the edit panel and change the direction of the road. - Select the problem on the map once again in order to view the information on the problem on the edit panel.
- On the bottom of the editing panel notice the resolve option – below that there are 3 option to resolve the problem.
- From the 3 options select fixed and confirm
Problem number 59 – unmatched resolve paths.
This problem occurs when the program matches the session with an incorrect route on the map.
Possible causes of this problem is when segments on the road are not connected properly, when the directions are not set properly, and other scenarios.
 Solution:
To resolve this problem, first you must understand what caused the anomaly that prevented the correct route from being matched, and locate the point where navigation is not proper.
- Select a problem, and select view relevant session. Two segments will be highlighted in yellow: previous segment and next segment. These segments, in case of this problem, indicate the connection where routing is not possible. Deviations of GPS tracks that do not allow continuous routing lead the program to choose the closest possible segment incorrectly.
- Identify the road segments where the selected track is not possible to route on, and which led the program to choose an incorrect route - and correct these segments.
- You should check that the shape of the road is consistent with the aerial photo that appears in the background and allows continuous driving, without sharp angles. To change the road shape, select the road segment and in the edit panel select edit road geometry.
- Make sure the arrows that appear on the road map correspond to the direction of traffic reality. To change the direction, select edit road details in the edit panel and change the direction of the road.
- Select the problem on the map once again in order to view the information on the problem on the edit panel.
- On the bottom of the editing panel notice the resolve option – below that there are 3 option to resolve the problem.
- From the 3 options select fixed and confirm
Problem number 60 - Route disconnected
At some occasions the GPS session cannot be matched to a complete route on the map as some roads along the route are disconnected.
 Solution:
- Select the problem and select view relevant session. The problem may appear on a wide range so the map will be shown on a greater zoom level than usual. In certain situations, it might appear unusually large number of problems number 60 – where each problem indicates that there is a disconnection along the route. Keep in mind that in order to see the actual GPS points you might need to zoom in.
- Check all of the route to ensure that the road segments are connected to each other by checking the Highlight connectivity.
- Check that the shape of the road is consistent with the aerial photo that appears in the background and allows continuous driving, without sharp angles. Change the shape of the road if needed by selecting the Edit road geometry in the edit panel.
- Make sure that the arrows that appear on the map correspond to the direction of traffic in reality. To change the direction, select edit road details in the edit panel and change the direction of the road.
- Select the problem on the map once again in order to view the information on the problem on the edit panel.
- On the bottom of the editing panel notice the resolve option – below that there are 3 option to resolve the problem.
- From the 3 options select fixed and confirm.
