The following article contains key information on properly creating junctions and the roadways between them. Be sure to review it in its entirety before editing the map.
Méně je více
Při tvorbě křižovatek libovolného tvaru a organizace je třeba mít vždy na paměti, že občas musíme přimhouřit oko nad tím, jak křižovatka vypadá v reálu a jak ji zakreslíme do mapového systému. Cílem je zachytit realitu v co nejjednodušší možné podobě a komplexní řešení začít používat teprve tehdy, je-li to nutné k uspokojivému vyřešení situace.
Základy ← ZAČNĚTE ZDE
Co je křižovatka?
Tak jako v reálném životě, i v systému Waze potřebujeme k tvorbě křižovatky několik věcí:
- Dva nebo více segmentů silnice či jakékoliv jiné cesty
- Bod, kde se segmenty protnou (tedy vznikne samotná křižovatka)
- Zakázaná a povolená odbočení pro všechny příjezdové a odjezdové cesty do a z křižovatky
Pokud nevíte, jak vytvářet a upravovat silnice, křižovatky nebo zatáčky, přečtěte si prosím rychlý průvodce editováním pro začátečníky ![]() . Poté si ještě prostudujte stať o posouvání a mazání křižovatek
. Poté si ještě prostudujte stať o posouvání a mazání křižovatek![]() . Stejně tak je dobré podívat se do slovníku, termín Křižovatka
. Stejně tak je dobré podívat se do slovníku, termín Křižovatka![]() , kde jsou přehledně uvedeny různé typy křižovatek.
, kde jsou přehledně uvedeny různé typy křižovatek.
Křižovatka typu "T"
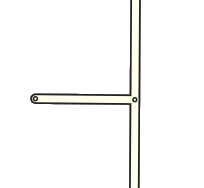
Začněme se základním typem křižovatky, kdy z obvykle průběžně vedené cesty odbočuje další. Odbočení obvykle svírá úhel kolem 90 stupňů. To je ta nejjednodušší situace, na kterou můžeme na mapě narazit - do mapového editoru ji zakreslíme tak, jak existuje i v reálu.
Existuje mnoho silnic, které vzájemně nejsou pravoúhlé. Dokonce i ve městech, které obvykle dodržují pravoúhlost, takové silnice často najdete - vznikly ještě dříve, než se začala dodržovat pravoúhlost. Výchozím stavem je pro nás realita, kterou si zakreslíme do editoru - dvě silnice, které spolu svírají ostrý úhel.
S tímto postupem ale máme malý problém. Díky úhlu svíraného silnicemi bude navigační aplikace dávat příkaz "Zůstaňte vpravo", zatímco "Odbočte vpravo" by v dané situaci bylo vhodnější. Pokud bude rovná silnice silnicí první třídy, tak dostanete hlášku "Sjeďte vpravo", což v řadě situací může být matoucí. V některých případech nedostanete hlášku vůbec žádnou. V nejhorším případě navigační server![]() vyhodnotí odbočovací úhel jako příliš ostrý a vůbec nenavrhne odbočení - na vzorovém obrázku by vás při cestě "shora dolů" odmítnul pustit doleva. A nakonec díky automatické detekci chyb v mapě může být v tomto místě detekován problém, protože zakreslený průnik silnic bude "příliš daleko" od míst, kudy v reálu svým autem při odbočení projedete.
vyhodnotí odbočovací úhel jako příliš ostrý a vůbec nenavrhne odbočení - na vzorovém obrázku by vás při cestě "shora dolů" odmítnul pustit doleva. A nakonec díky automatické detekci chyb v mapě může být v tomto místě detekován problém, protože zakreslený průnik silnic bude "příliš daleko" od míst, kudy v reálu svým autem při odbočení projedete.
Abychom eliminovali tyto nejednoznačnosti, musíme zakreslit křižovatku z logického pohledu. Jde nám v principu o to, aby uživatel dostal příkažy "Odbočte vlevo", případně "Odbočte vpravo". Tvar křižovatky tedy trochu upravíme, aby spojené silnice svíraly úhel přibližně devadesátistupňový. Toho docílíme přidáním jednoho nebo více geometrických bodů (které se automaticky vytvoří v okamžiku, kdy myší chytíte zvýrazněný střed segmentu a potáhnete). Pomocí geometrických bodů můžeme poté doladit tvar křižovatky, aby co nejvíce odpovídala reálu. OVšem s mírou; mějme na paměti, že každý další bod znamená přenášená data navíc a význam pro samotnou navigaci na displeji mobilního zařízení je malý.
Nyní máme křižovatku, která se logicky chová jako základní pravoúhlá křižovatka a vizuálně přitom odpovídá realitě. Následující obrázek ukazuje příklad z reálného světa - křižovatka poskytuje správné navigační instrukce a je umístěna tak, že nehrozí automatická detekce falešného problému "cesty jsou od sebe příliš vzdáleny":
Sjezd z dálnice je dalším dobrým příkladem, kdy jsou dodatečné geometrické body užitečné. Obzvláště když si uvědomíme, jak malý úhel obvykle sjezdy s dálnicí svírají.
Nedostatkem tohoto způsobu kreslení (který by se ostatně projevil i o příklad výše) může být to, že může být v editoru obtížné nastavení povolení odbočení klikáním na šipky, protože se tyto šipky vzájemně téměř překrývají.
Jakmile ale přidáme další geometrický bod, aby byl úhel sjezdu vůči původní silnici blíže nějakým 20-30 stupňům, budou šipky mnohem lépe viditelné a přístupné. Více informací ohledně vlivu geometrie segmentu a úhlů na hlasové instrukce najdete dále na této stránce.
Nyní jsou tedy šipky viditelné a přístupné. Je dobré vědět, že klávesovou zkratkou S v editoru dojde k Separaci šipek a přeskupí se tak, aby se na ně dalo pohodlně kliknout, pokud se z jakéhokoliv důvodu skrývají za sebou a nejsou pohodlně dosažitelné. Víc informací o klávesových zkratkách je v článku keyboard shortcutshttp://wiki.waze.com/wiki/images/c/ce/Gb.png.
Nyní jsme tedy zajistili, že se křižovatka chová tak, jak bychom očekávali. Protože jsme si pomohli dodatečným úhlem, můžeme jasně vidět i nastavit povolení odbočení a zároveň jsme dodrželi soulad nakreslené mapy s realitou.
Křížovatka typu "+"
Výše uvedené postupy lze aplikovat i na klasickou čtyřramennou křižovatku. Opět lze očekávat, že úhly budou ve výchozím stavu přibližně pravoúhlé.
Pokud se cesty kříží v jiném než pravém úhlu, měli bychom se opět snažit s tím něco udělat a tuto "nepravoúhlost" co nejvíce potlačit.
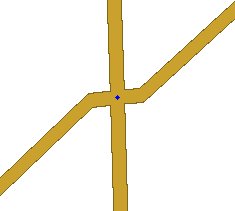
Použijeme geometrické body a místo křížení uděláme co nejvíce pravoúhlé. Můžete si přiblížit mapu a přidat geometrický bod co nejvíce středu křižovatky, jeden z každé strany šikmé ulice. To zajistí správný úhel křížení, zatímco při běžném pohledu bude skoro neviditelné, takže nakreslená křižovatka bude na první pohled vypadat přesně jako v reálu.
Obrázek nahoře ukazuje, jak křižovatka vypadá po maximálním možném přiblížení. Když si pohled oddálíte, zjistíte, že vypadá tak, jako v reálu.
A tady je příklad ze skutečnosti - je částečně přiblížen, aby bylo dobře vidět řešení pomocí dodatečných geometrických bodů.
Po této úpravě bude křižovatka poskytovat jasné navigační instrukce pro odbočení vlevo či vpravo, přičemž vizuálně budou cesty stále svírat úhly, které v reálu svírají.
Nastavení hlasových instrukcí
Než půjdeme dále, ujistěte se, že rozumíte systému nastavování povoleného a zakázaného odbočení, tzv.restrikcí odbočení http://wiki.waze.com/wiki/images/c/ce/Gb.png v editoru map. Pokud nejsou všechna odbočení správně zapnuta, vypnuta či omezena, nemůžete nikdy získat správné hlasové navigační pokyny.
V sekci nahoře pojednávající o Základech jsme již naťukli způsob, jakým vynutit hlasové instrukce "Odbočte" místo "Zůstaňte". Detailněji se touto tematikou zabývá stránka How Waze determines turn / keep / exit maneuvers http://wiki.waze.com/wiki/images/c/ce/Gb.png, nicméně souhrn toho podstatného je popsán i v odstavcích níže.
Geometrie
Budete-li se u všech křižovatek snažit volit z několika základních typů a úhlů, bude mnohem jednodušší předvídat chování hlasové navigace pro každou individuální křižovatku, aniž by bylo nutné chápat všechny algoritmy, které Waze používá.
- Přibližně 90 stupňů úhel příjezdu vůči odjezdu =instrukce Odbočte
- Úhel příjezdu vůči odjezdu je mezi 20 a 30 stupni:
- pokud odbočení probíhá na silnicích v editoru zvolených jako Primary Street (Silnice III. třídy) nebo nižších = instrukce Zůstaňte vlevo či vpravo
- probíhá-li odbočení na sjezdech či nájezdech - Rampách (Ramps) a/nebo na silnicích zvolených v editoru jako Minor Highway (Silnice II. třídy) a vyšších = použije se Sjeďte vpravo / Zůstaňte Vlevo pro země s jízdou po pravé straně. Obdobně se použije Zůstaňte vpravo/Sjeďte vlevo pro země s jízdou po levé straně http://wiki.waze.com/wiki/images/c/ce/Gb.png.
- Úhel příjezdu vůči odjezdu přibližně 0 stupňů znamená, že nebude poskytnuta žádná navigační instrukce
POZNÁMKA: Tato pravidla mají několik výjimek, protože geometrie není jediným faktorem, podle kterého jsou stanovovány hlasové instrukce. Stejně tak mohou být instrukce ovlivněny pojmenováním segmentu a nastavením jeho typu; více detailů najdete dále v tomto tématu.
Uvedené úhly nám umožňují mít jasnou představu o výsledku (""odbočte" versus "zůstaňte") a zároveň nás budou držet od hraničních hodnot. Například úhel 45 stupňů je hraniční hodnotou mezi "odbočte" a "zůstaňte", což znamená, že úhel 44,5 stupně bude dávat jiný příkaz než 45,5 stupně, ačkoliv okem nám budou oba úhly připadat totožné.
Máme-li například křižovatku typu Y a chceme jasně deklarovat, který směr je rovně"a který odbočuje, tak nám nepomůže, když jedna odbočující větev bude mít úhel 0 stupňů a druhá třeba 5 stupňů. Musíme danou křižovatku upravit tak, aby směr, který chceme považovat za rovný, měl 0 stupňů a směr, který je braný jako odbočný, svíral úhel třeba 20 stupňů. Nejspíš nikdo z nás nebude mít při editaci po ruce úhloměr, takže je nejlépe se vyhnout situacím, kdy se dostaneme k hraničním hodnotám. Ještě lépe je doinstalovat si do prohlížeče speciální skript, který nám bude ukazovat úhly, které segmenty v dané křižovatce svírají.
S těmito znalostmi můžeme upravit chování navigace na křižovatce pouhým upravením často i jediného geometrického bodu. To se často hodí u křižovatek navrhovaných na stejné úrovni (žádné "stoupání" nebo "klesání" silnice v reálu i editoru), kdy někdy se spíše hodí odbočení a někdy je zase vhodnější příkaz "zůstaňte...".
Na následujícím obrázku tedy dostaneme povel "Zůstaňte vpravo", protože výchozí část odbočující jednosměrky svírá úhel 20 - 30 stupňů:
Ale když posuneme geometrický bod a vytvoříme přibližně úhel 90 stupňů, dostanem rázem povel "Odbočte vpravo".
Konec tohoto jednosměrného segmentu se bude chovat velice podobně. Bude-li úhel mezi 20-30 stupni, nezazní žádný hlasový povel, protože se cesta hladce spojuje s vodorovnou cestou a i v reálu se oba dopravní směry plynule sjíždějí. Pokud bychom ale nastavili geometrický bod tak, abychom docílili přibližně 90 stupňů, pak zazní povel k odbočení vpravo.
Furthermore, if the North-South road in that last example were a Minor Highway or a Major Highway, the 20 to 30 degree angle at the start of the connector would produce an "Exit" instruction which may be more confusing than a "Keep" instruction would have been. So unless this connector is signed with an actual exit sign, a 90 degree start to the connector to produce a "Turn" instruction is most likely preferred.
Segment Naming and Type
The names and road types of the attached segments affect the routing algorithms, in addition to the geometry of the road segments,
A rule of thumb is if you want a turn to be announced, having a name difference between segments will improve the chances (but not guarantee) that it will happen. In the case of the at-grade connector example above, the connector should either have a different name than the road it is leaving, or no name at all. (See At-grade connectors#Road name.)
Road type is a factor in determining navigation instructions as well, but names and angles are much more important. If you have multiple roads meeting at a junction and two of those road segments line up at close to zero degrees and they have the same name, that will be considered straight no matter what road types are used. An example demonstrating this is shown in the discussion on Y-intersections in a later section.
Road type will be the determining factor when all names are different. For example imagine you have a Ramp segment leading to a Freeway segment and another Ramp segment. The Ramp segment will be considered the "straight" continuation and there will be no announcement while a navigation instruction will be given to proceed to the Freeway segment. This is true even if the initial Ramp and the Freeway align at close to 0 degrees and the second Ramp departs at a 20 to 30 degree angle.
Surface Streets
Y Intersections
When surface streets meet in a Y formation and we must carefully consider how they are mapped to provide useful navigation instructions. As the How Waze Determines turn/keep/exit maneuvers page explains, segment names and geometry are very important in determining what navigation instructions are given.
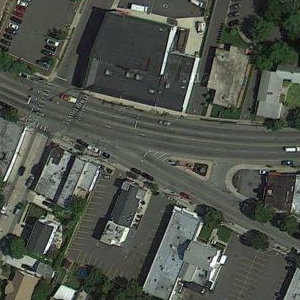
In the example below, the multi-lane surface street is known as Main Street to the west and Atlantic Ave to the east. The name change occurs when Main St branches off as a regular surface street.
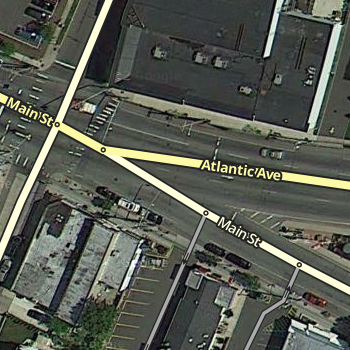
The description above is how a human would probably describe the situation, but as you can see in the image above, a more technical description would be that Main St travels in a perfectly straight line and Atlantic Ave branches off of it. But if we map it that way in the editor, we create a major problem.
Since the multi-lane segment of Main St and the regular street segment of Main St have the same name, the routing engine automatically considers that to be "straight". If the two sections line up in a straight line the way they appear from the sky, then we are reinforcing the idea that "straight" is Main St. to Main St.
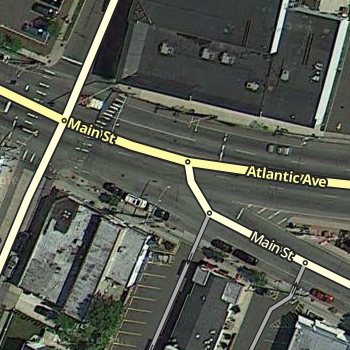
But as a typical driver would want, "straight" should be the path that remains on the multi-lane roadway, regardless of what the name is. To make sure the routing engine understands the proper treatment of the junction, we have to be deliberate with the segment geometry of all three involved segments. We end up with something like this:
Now the geometric definition of straight is the multi-lane portion of Main St. onto Atlantic Ave., since we have made that transition as close to zero degrees as possible. The regular street portion of Main St. now branches off at an angle close to 90 degrees. The routing engine should recognize that a turn is required. So the result is that Main St. to Atlantic Ave. has no announced turn, and multi-lane Main St. to surface road Main St. has a turn announced. Exactly what most drivers would expect in the real world.
No Outlet Roads
Roads which only have one way in and one way out can present challenges to the routing server, although they seem simple to our minds.
Dead Ends
Dead Ends (a.k.a. No Exit, Closed, No Through Road, No Outlet) are road segments that simply end, with no continuation or connections at one end. In some areas, a Dead End may be synonymous with a Cul-de-sac. In the US, a "No Outlet" sign may be used to indicate a road which itself is not a dead end, but it only connects to other dead end roads. It can also be used as a "friendlier" alternative to the typical Dead End sign.
Within the Map Editor it is possible to represent a dead end road with multiple segments if there are private driveways or parking lot roads mapped and connected. In that case, only the very last segment is considered the dead end segment.
Make sure that there is a junction indicator (the small blue dot, not just a geometry node) at the very end of the segment. While this one segment does not actually constitute a junction, the small blue dot is a visual indicator to the editor that the end of this segment is properly set up. This is necessary to ensure proper routing out of the segment. See the Cul-de-sac section below on when and how to fix this.
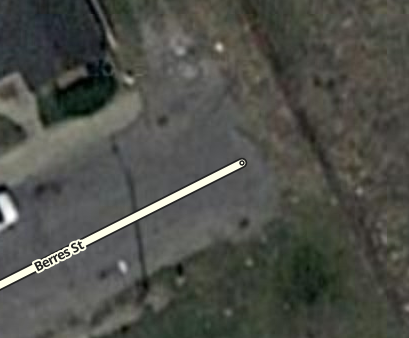
This final junction indicator must be located near the end of the road, but it should be located where there is still pavement as not to negatively impact client routes. Waze only considers the road fully traversed if both ends of the segment are fully crossed. If the junction indicator at the end of the segment happens to be at the edge of the pavement (or off of the road surface if aerials are not exactly aligned), it will be very difficult for a driver to cross that junction. A good rule of thumb is to have the end of the segment the same distance from the end of the pavement as it is from each side of the road.
With such a placement, the driver is given a chance to cross that junction indicator for that segment.
Cul-de-sacs
See also: Cul-de-sac article on Wikipedia
A Cul-de-sac (a.k.a. Court in the US) is a common treatment of a dead end street in a residential neighborhood.
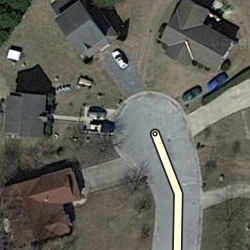
In almost every situation, a cul-de-sac should be treated exactly as a dead end street, with the final junction indicator in the center of the bulb of the cul-de-sac. Be sure the free end of the final road segment has small blue dot displayed at the tip (when not editing or selecting the segment). If there is no blue dot, please correct it by following the steps for fixing dead ends.
The junction indicator should be located close to the middle of the bulb and NOT near the outer edges. If the end of the segment is positioned along the perimeter of the bulb, there may be difficulty in processing client routes. Waze only considers the road fully traversed if both ends of a segment are crossed. If the end of the segment happens to be on the curb (or off of the road surface if aerials are not exactly aligned), it will be very difficult for a driver to cross end end of the road segment. With the junction in the middle of the visual road, we give a driver a good chance to cross the end of the segment no matter where they drive within the bulb. The exception to this guidance is given in the next example.
The cul-de-sac below, with a small island, should be treated as a basic dead end with no loop. The island can be ignored, as there is no significant routing question for the driver once they get to the cul-de-sac.
As for placement of the final junction indicator, here we may get better results by moving the junction out from the true center and over to the outer perimeter of the central island. The shift ensures that the driver has a good opportunity to cross the end of the segment.
However, if the cul-de-sac has a very large bulb with a large island in the middle, it may better be treated as a Loop. A good rule of thumb is if you were standing at the end of the cul-de-sac, can you tell that it is just a cul-de-sac? Or does it look like two different roads? If you see an island, but are not sure if it is significant, leave the Loop out. If "Missing Road" errors occur on the road, then add a Loop.
Loops
Loops are roads that you can enter, and without reversing course, end up at the same place you started.
An important Map Editor rule is: a road segment must not start and end on the same junction node.
If this rule is not followed, the routing server will have difficulty in providing routes into and out of the loop. Any loop broken into two segments by a junction will not have this problem.
Hopefully there will be another roadway along the loop road which you can map, which will break the loop into two pieces. If there are no interruptions to the loop and the entire loop is represented by one road segment that connects with itself, we must insert a superfluous junction node along the loop segment. The specific location does not matter, but most people put it near the half-way point of the segment.
NOTE: It is very easy for an editor to find the extra junction node, assume it is truly superfluous, and delete it! This problem is magnified if the loop road is large or shaped so it is not obvious that it is a loop. One solution is to identify a path or driveway branching from the loop road and add it to the map, forcing a 3-way junction that would be less likely to be deleted.
NOTE: The Map Editor may be resistant in editing a loop that does not already follow the rule that it must be broken in two. If you run into saving errors, try one of the following approaches:
If the loop and the road leading to it have the same name:
- Select the loop and the road
- click the bridge icon that appears (one end of the loop will disconnect from the other)
- split the loop
- reconnect the disconnected end of the loop
- confirm turns
If the loop and the road leading to it have different names:
- draw a new road segment that connect to the loop/road junction
- give that new road the same exact name as the loop
- select the loop and the new road segment
- click the bridge icon that appears (one end of the loop will disconnect from the other)
- split the loop
- reconnect the disconnected end of the loop
- confirm turns
Here is a video on YouTube showing the second method.
Roundabouts and Traffic Circles
Please see the Roundabout page for a full discussion of this special type of junction.
At-grade connectors
With exceptions, don't set these segments as ramps! Watch out for all of the turns you need to restrict. For a full discussion, see At-grade connectors.
Bow tie intersections
Šablona:Anchor The "bow tie" form of an intersection both simplifies and provides enhanced control when a dual carriageway road and a single carriageway road intersect.
By reducing the intersection to a single point, we gain control over U-turns and avoid short segments which may introduce complexity and routing issues.
The first instinct may be to map the intersection as the road is physically constructed -- using an "H" (a sideways H in this case) where each one-way roadway intersects the cross street. But if that method is used, there is no way to restrict the U-Turn movement from one one-way direction to the other since the center of the "H" carries both U-Turn traffic and traffic turning from the cross street. But mapped as a bow tie, there is a specific turn arrow that can allow or disallow the U-turn as needed.
Additionally, the center segment of the H may introduce complexity to the map. If the cross street changes names at the junction, care must be taken to make the center segment have no name assigned. This will cause the segment to inherit the appropriate name depending on the direction of travel. This center segment is then different from either side so future "select all segments" operations in the editor will not capture this segment which may complicate editing.
Finally, the Waze systems also have difficulty in capturing average speeds for short segments, especially when traffic does not travel across a majority of the segment which may happen in a wide intersection. The center of the H would be totally vertical in the example above, but turning traffic would be traveling in more of a 45 degree angle. Add in the inaccuracy of many consumer GPS chips and wide intersections and you may have traffic never actually driving over the segment for certain movements.
NOTE: Be aware of the geometry used in the bow tie. If the angles are too steep (45 degrees or greater) a driver traveling along one of the one-way segments may be told to "turn" or "stay" at the intersection instead of receiving no instruction.
NOTE: If the center of the physical "H" is long and/or allows traffic to stop and queue within the median of the divided roadway, a bow tie may not be appropriate. In these cases the segment may be long enough to justify being mapped especially if the one-way roads would have to deviate greatly from their physical location to meet in a single point.
Ramps
Ramps have a very specific purpose in Waze. They are intended to connect segments of Minor Highways, Major Highways, and Freeways to roads where there are no at-grade crossings.
When to use ramps
The following conditions must be met for the use of ramps to be appropriate:
- Two roads cross over/under each other with no at-grade junction
- At least one of the roads are of these types
- Minor Highway
- Major Highway
- Freeway
- Ramp
If the above requirements are not satisfied, you may be dealing with an at-grade connector, which typically does not use the ramp type. However, there are some at-grade connectors which do use the ramp type.
How complex should ramps be?
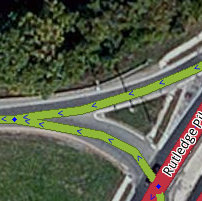
Rule #1 is still simpler is better. If there is no large distance between paths at the end of a ramp (either into or out of the ramp), a single segment connecting to a single junction node is all that is needed. The existence of a painted, concrete, or grass island is NOT enough of a reason to split a ramp into multiple ramps.
When paths at the end of the ramp deviate significantly in distance, regardless of the existence of any type of island, then multiple ramps should be used.
Highway/Freeway Junctions
These are junctions involving the three Highway/Freeway road types - Minor Highway , Major Highway , and Freeway -- as well as their Ramps .
Specific examples of how to handle common junction types are provided in later sections. All of those examples use the basic building blocks provided here.
If you are unsure what road type you should use, refer to the following pages for more information.
Highway/Freeway Exits
It is a basic Exit situation when a "straight" direction is obvious to a driver and navigation instructions are only needed for the non-straight direction (the exit.) If navigation instructions are required for both directions, see the Wayfinder Segments section below.
Structure
To be treated as a basic Exit, the following must be true:
- The entering segment and one exiting segment must be one of the three Highway/Freeway types
- The Highway/Freeway exiting segment must have close to a zero degree departure angle from the entering segment
- The other exiting segment must be of the type Ramp
- The Ramp exiting segment must have a departure angle of between 20 and 30 degrees from the entering segment
When those conditions are met, the navigation will present an "Exit Right/Left" instruction when the ramp is to be used, and will remain silent when the exiting Highway/Freeway segment is to be used.
Naming
The Highway/Freeway segments before and after the junction should be named the same. The ramp segments should be named in accordance with the best practices in your location.
Naming standards for other areas
Editors covering areas that do not have specific best practices should review the existing guides for other areas, and determine which best matches the roadways of your area.
Highway/Freeway Splits
A Highway/Freeway Split is when a Highway/Freeway segment meets at a junction with two other Highway/Freeway segments and there is no obvious straight through direction to a driver.
Structure
To receive a navigation instruction for both branches of a split, the following must be true:
- All segments must be one of the three Highway/Freeway Types
- All segments must have names which are different from each other
- The two exiting segments must have departure angles of 20 to 30 degrees from the entering segment
With those conditions met, the junction will present "Keep Left" and "Keep Right" navigation instructions using the name of the appropriate exiting segment.
Naming
The primary rule is that all 3 segments at the junction must have different names. That can be accomplished in one of two ways:
- Using road names alone - It is an easy situation if all three roads which connect have different names. If "Highway A" splits into "Highway B" and "Highway C", then that is all we need to have a properly functioning split.
- Using signs and Wayfinder Segments - If one of the branches of the split has the same name as the entering segment, we must create uniqueness at the junction. If "Highway X" splits off from "Highway Y" and "Highway X" continues as the other branch, the preferred approach is to use named Wayfinder Segments.
Wayfinder Segments
It may be necessary to provide additional information to a driver for complex or confusing Exits and Splits. Examples of such situations include:
- Lane Drops - Highway has been 3 lanes for miles and miles, but only 2 lanes continue straight through at a certain point
- Inconsistent signage - Highway continues as a numbered route, but signs only call it by a name instead
- Non-obvious continuations - In a Right-hand traffic country, exiting traffic is to the left and continuing traffic is to the right
In these cases we need to use short way-finder or path-finder segments which are named with the information displayed on the roadway signs. There are two methods to accomplish this: using Highway/Freeways or using Ramps.
- Highway/Freeways
- Pro: provide a consistently rendered line on the map with no breaks
- Pro: does not introduce a routing penalty for the transition to Ramp type (although we do not know how much of an impact, if any, this has in actuality)
- Con: the long name of the segment may be displayed on the map creating clutter
- Con: the segment may be hard to see in the editor since it may blend in with the main Freeway
- Note: will provide "Keep Left" and "Keep Right" instructions
- Ramps
- Pro: ensures any long names are hidden from display on the map
- Pro: forces the client to stay zoomed in for the length of the segment to give a close view of the split to the driver
- Con: introduces a routing penalty of the transition to Ramp type (although we do not know how much of an impact, if any, this has in actuality)
- Con: may render as a broken line on the map
- Note: will provide "Keep Left" and "Exit Right" instructions in Right-hand traffic countries and "Exit Left" and "Keep Right" instructions in Left-hand traffic countries.
In both cases, the two exiting segments MUST have identical road types and different names from themselves and the entering segment.
Here we show Highway Y splitting off from Highway X. By labeling segments with the information available on the road signs at the split, we have achieved uniqueness and provided additional useful information (the destination cities) to the driver. We can achieve the desired results using either approach. First as all Freeway segments:
And then using Ramps (which are named how they appear in the all Freeway example):
At times it is also necessary to use a way-finder at an Exit if a driver needs advance notice that only some lanes of the roadway continue straight through. Again we can accomplish this using either of the two methods. First using Freeway segments for the split (the right branch wayfinder is un-named and the ramp segment that follows contains the appropriate name):
And then using Ramps (again, named the same as above):
A rule of thumb for the way-finder segments is to make them 15 to 20 meters long. This keeps the segment small so we are less likely to see it in the client, but keeps it long enough to find and manipulate in the map editor. (In the near future, Way-finder segments may need to be greater than 5 meters long to prevent routing issues.)
Ramp to Ramp Splits
A ramp may itself split and branch into two directions. If this is the case, "Exit Right" and "Exit Left" will be announced using the name of the appropriate exiting segment in all cases.
Structure
Naming
If ramps are unnamed, the name of a subsequent ramp will propagate backwards. In the example above, if the two ramps exiting the junction are named, the ramp entering the junction can be left unnamed. Then any navigation instruction directing you onto the first ramp would use the name of the appropriate exiting ramp.
Example: The two ramps exiting the junction are named "DestinationLeft" and "DestinationRight". The ramp that enters the junction is unnamed. If you need to "Exit Right" onto the unnamed ramp. If you are headed to "DestinationLeft", navigation would tell you:
- Exit Right to Destination Left
- Exit Left to Destination Left
Using unnamed ramps is very useful to provide sufficient notification of an approaching decision point, as long as the names of both ramp splits are visible on signs at the start of the initial ramp.
Example of good use of unnamed ramps:
- Initial Exit Sign: to City A and City B
- Destination Left Sign: to City A
- Destination Right Sign: to City B
Result: An unnamed initial ramp will provide accurate and informative navigation instructions to the driver.
Example of poor use of unnamed ramps:
- Initial Exit Sign: to Downtown
- Destination Left Sign: to Downtown
- Destination Right Sign: to Center St
Result: An unnamed ramp may create confusion since both Destination ramp names are NOT listed on the initial exit sign. In this case the initial ramp should be named.
Example of modified use of unnamed ramps:
- Initial Exit Sign: Exit 70A-B to City A and City B
- Destination Left Sign: to City A
- Destination Right Sign: to City B
- Destination Left name in Waze: Exit 70A: City A
- Destination Right name in Waze: Exit 70B: City B
Result: By using a modified name for the destination ramps, we have combined information from two sets of signs to generate the advance notice a driver may need to prepare for a decision point.
Limited Access Interchanges
Please see the Limited Access Interchange Style Guide.
Special Cases
Transitions
A transition is a non-junction depicted using a junction node.
Valid examples of where to use a Transition node include:
- Road name changes
- City Limits
- Road Direction changes
- Part of a Loop Road
An old reason to use a transition node was to indicate segments of the road with different house numbering. With the new point numbering scheme being adopted by Waze, this is no longer a reason to use transition nodes.
There may be existing Transition nodes on the map for other reasons (left after a connecting road was deleted, inherited from to the original base map import when things such as rivers and streams created junctions, etc.).
As long as we are certain it is not a valid Transition node, a superfluous junction node may be deleted. Doing so will simplify the map, eliminate turn restrictions to maintain, and reduce computing resource needs. Also consider removing the geometry node which will replace the junction node you delete, if that geometry node is not needed.
Roads to Nowhere
In certain situations it may be necessary to add road segments that are un-drivable in order to provide accurate navigation instructions.
Actual
A valid use of this technique is at the temporary end of a freeway. As a freeway is built, it is often opened in sections, up to a certain exit. If we map this as a regular freeway segment leading to a ramp segment, no announcement will be made for that final exit, no matter what we name the exit ramp.
This can be confusing if the ramp is set up as a properly signed and numbered exit, especially if a driver is traveling a long distance on this freeway. Imagine traveling down a freeway and seeing your next instruction is "turn left at Main St." You would probably wonder if there was a map error since you shouldn't be making left turns off of a freeways.
If we map even just a little of the future path of the freeway, this gives the routing engine a junction which will generate an "exit" instruction at the end of the freeway, thus eliminating any confusion.
Conversely, if we do NOT want an exit instruction at the end of a freeway, ensure there are no road segments extending past the final exit, to ensure the final exit is the only path out of the final freeway segment.
Fake
(coming soon)
Offset Roads
Sometimes you will find two roads which cross, where one does not quite line up with the other.
There are a few things we need to look at in this situation.
- Do the roads actually line up in reality? If so we need to modify the junction to be a basic 4-way junction.
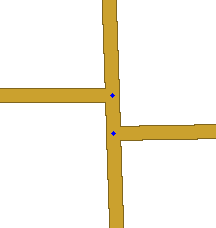
- Do the roads ALMOST line up in reality? If you were giving instructions to a person and would tell them to go straight with no mention of any slight turn or jog, then we want to make it into a 4-way junction. You may need to "split the difference" and not follow the centerline of either road to achieve this. The angles are exaggerated in this next example to show how the junction is forced to be close to 90 degrees, then we taper to the true centerlines of the roads. In practice this can be much more gradual and/or done while zoomed in very close.


- Finally, is there a true separation between the roads? Would you need to say for example "turn left then make an immediate right"? If so then we will want to leave the junction such that the two sides do not align.

Since we want to avoid very short segments of road (the GPS chips in consumer devices can be very inaccurate which may make it seem that a driver skipped right over a short segment. This will result in automated map errors and possible route recalculations in the client,) it may be wise to shift the side roads as far apart from each other as possible with them still in the proper location (along the far curb lines for a residential street for example). This will maximize the length of the short segment between the side roads.


