No edit summary |
m (→Speed limit) |
||
| (17 intermediate revisions by 6 users not shown) | |||
| Line 1: | Line 1: | ||
====Road Properties==== | ====Road Properties==== | ||
{{mbox | |||
| type = important | |||
| textstyle = color: red; | |||
| text = It is important to follow the guidelines for setting road properties established by your [[Countries_and_Languages|country or region]]. | |||
}} | |||
<noinclude>{{Related|Map Editor Interface and Controls #Left Pane with segment(s) selected|Creating_and_editing_road_segments#Road_Properties|Creating and editing road segments #Set Road Type, Direction, and Elevation}}</noinclude> | <noinclude>{{Related|Map Editor Interface and Controls #Left Pane with segment(s) selected|Creating_and_editing_road_segments#Road_Properties|Creating and editing road segments #Set Road Type, Direction, and Elevation}}</noinclude> | ||
The road segment properties are below the address properties on the General Tab. | The road segment properties are below the address properties on the General Tab. | ||
| Line 7: | Line 12: | ||
The road type is changed by selecting the appropriate road type from the drop down box. | The road type is changed by selecting the appropriate road type from the drop down box. | ||
See the [[Road types and names]] for your country for further guidance on selecting the correct road type. | See the [[Road types and names]] page for your country for further guidance on selecting the correct road type. | ||
{{Clear}} | {{Clear}} | ||
=====Special Properties===== | =====Special Properties===== | ||
[[File:SpecialProperties2015.png|right|frame]] | [[File:SpecialProperties2015.png|right|frame]] | ||
Select the box for toll road if the segment meets the | * [[Best_map_editing_practice#Toll_roads|Toll roads]] - Select the box for toll road if the segment meets the guidelines | ||
* [[Tunnel]] - Select the box for tunnel if the segment meets the guidelines. | |||
Select the box for tunnel if the segment meets the | |||
{{Clear}} | {{Clear}} | ||
| Line 33: | Line 38: | ||
=====Speed limit===== | =====Speed limit===== | ||
[[File:SpeedLimit.png|right|frame]] | [[File:SpeedLimit.png|right|frame]] | ||
The speed limit fields are shown for the segment. These fields should be updated with the official speed limit as shown on speed limit signs. The speed limit is shown in either km (Km/h) or miles (mp/h), depending on which unit type is selected in the [[Map_Editor_Interface_and_Controls#Settings_Tab|settings tab]]. | |||
If the speed limit | [[File:VerifySL.png|right|frame]] | ||
In some locations Waze has run a program to predict speed limits and assign the assumption to segments. When a segment has an assumed speed limit, the limit will be ignored by the app until an editor verifies it. WME displays a '''Verified''' check box next to the speed limit field. If you can verify that the speed limit shown is correct, check the Verified box. If you find it to be incorrect, replace the Waze-supplied speed limit with the correct speed limit (there is no need to check the Verified box). Either way, once you save, WME will stop displaying the Verified check box, since it is only needed until verified or corrected. | |||
{{mbox|type=caution|text=Pay attention to the units type displayed next to the speed input field (mph/kph) and be sure to adjust your settings if needed to enter the correct speed. | |||
---- | |||
NOTE: The "Verified" check box will not display when multiple segments are selected, even if they have unverified speed limits.}} | |||
:'''''For more details on speed limits policies and how to enter them, see the [[Speed limits]] article.''''' | |||
{{Clear}} | {{Clear}} | ||
Latest revision as of 04:11, 25 April 2016
Road Properties
| It is important to follow the guidelines for setting road properties established by your country or region. |
| This nugget is one of several version on this topic. Each version presents the same content with a different level of detail. If you are editing the content of this nugget, please also check if the related versions require the same edit. |
The road segment properties are below the address properties on the General Tab.
Road Type
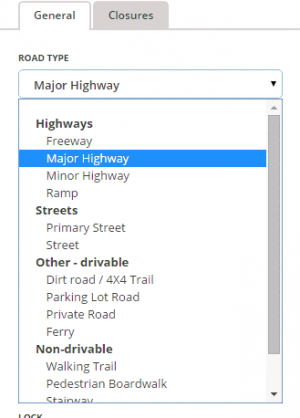
The road type is changed by selecting the appropriate road type from the drop down box.
See the Road types and names page for your country for further guidance on selecting the correct road type.
Special Properties

- Toll roads - Select the box for toll road if the segment meets the guidelines
- Tunnel - Select the box for tunnel if the segment meets the guidelines.
Road Direction
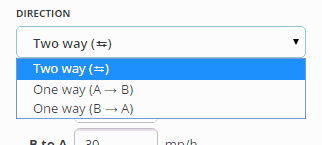
The direction of the road is changed by selecting the appropriate direction from the drop down box.
If traffic may travel both ways on the road, select "Two way." If traffic may travel only one-way on the road in the direction from the ![]() toward the
toward the ![]() select "One way (A→B)." If traffic may travel only one-way on the road in the direction from the
select "One way (A→B)." If traffic may travel only one-way on the road in the direction from the ![]() toward the
toward the ![]() select "One way (B→A)."
select "One way (B→A)."
After the road properties are saved, the direction is indicated by black arrows on the road.

Base mapped roads are originally assigned the direction of unknown. When the direction is set to "Unknown", Waze automatically adjusts the directionality of the road as Wazers drive it. When editing, make every effort to determine the correct direction of the road and choose either "Two-way" or the appropriate "One-way" direction.
See the article determining one-way streets for more information on determining the direction of a road as being one way or two way.
Speed limit
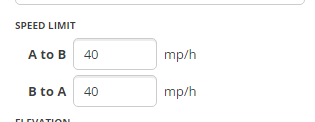
The speed limit fields are shown for the segment. These fields should be updated with the official speed limit as shown on speed limit signs. The speed limit is shown in either km (Km/h) or miles (mp/h), depending on which unit type is selected in the settings tab.

In some locations Waze has run a program to predict speed limits and assign the assumption to segments. When a segment has an assumed speed limit, the limit will be ignored by the app until an editor verifies it. WME displays a Verified check box next to the speed limit field. If you can verify that the speed limit shown is correct, check the Verified box. If you find it to be incorrect, replace the Waze-supplied speed limit with the correct speed limit (there is no need to check the Verified box). Either way, once you save, WME will stop displaying the Verified check box, since it is only needed until verified or corrected.
| Pay attention to the units type displayed next to the speed input field (mph/kph) and be sure to adjust your settings if needed to enter the correct speed.
NOTE: The "Verified" check box will not display when multiple segments are selected, even if they have unverified speed limits. |
- For more details on speed limits policies and how to enter them, see the Speed limits article.
Road elevation
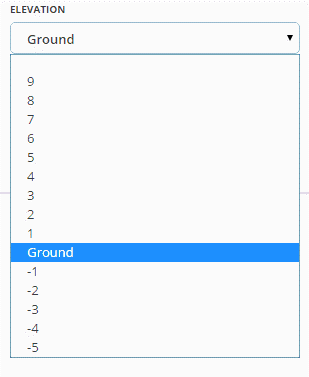
The Road Elevation should be changed where one road passes over another. By default, the Elevation of a segment is Ground (zero). When two segments overlap but do not actually connect in the real world, the value of Elevation for each segment must be different. This ensures that the Waze problem detection system doesn't flag the spot where two segments overlap as a location where a junction might be needed.
The visual representation of the relative Road Elevation is different when viewed in the Waze Map Editor (WME) and the Client application.
1. The Client App displays segment elevation based on the road type only, meaning Freeways are always on top, Major Highways are next, followed by Minor Highways, Ramps next, Primary Streets below all those, and finally Streets are at the bottom. This is the same order seen when setting the road type in the editor.
2. The WME uses the Road Elevation setting to display the relative elevation of the road. It displays the road with the highest "elevation" number at the top of the visual stack and works its way down as would be expected.
Although the client application does not benefit from the Road Elevation setting, it is recommended to set the Road Elevation relative to the physical mapping in the real world to enable possible future Client application updates to show the same visual representation as the WME.
3. Elevation -5 is used for non-drivable roads to help ensure that the routing engine does not try to connect or route drivers from roads onto non-roads by mistake. It acts to prevent false system reporting that the roads should be connected.
See Bridges for more information on elevation.
Road lock
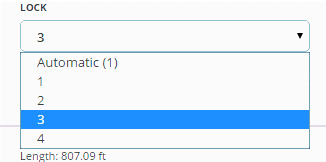
The road lock menu displays locking levels available to each individual user. In the example to the right, the level 4 editor can assign a lock level of 1, 2, 3, or 4. Once the lock level is saved, an editor of an lower level will not be able to make changes to the segment.
See Locking segments for information.
House numbers

The house numbers is used to create and edit house numbers for named road segments.
See House numbers for more information.
