m (Created Redirect) |
(Página creada con «In unedited areas where the map is pretty raw from its import from public sources, all roads tend to be set to the same height with junctions between roads at different lev...») |
||
| Línea 1: | Línea 1: | ||
# | In unedited areas where the map is pretty raw from its import from public sources, all roads tend to be set to the same height with junctions between roads at different levels, such as overpasses and the freeways which pass under them. This can lead to incorrect and even dangerous navigation instructions. In these situations, it has happened that Waze would request that a driver turn while on a bridge to get to the interstate freeway below. | ||
So that the Waze routing servers understand the reality that an overpass doesn't intersect with the freeway, or an urban bridge doesn't intersect the streets of a neighborhood below, a map editor needs to be able to separate the roadways in an efficient manner. This is where the Elevation value assigned to a segment and the Bridge function comes to the rescue. | |||
==How overlapping roads are defined in Waze== | |||
Waze has a value called Elevation which is assigned to every segment. By default, the Elevation of a segment is "Ground" (equivalent to zero). When two segments overlap, the value of Elevation for each segment must be different. This ensures that the Waze problem detection system doesn't flag the spot where two segments overlap as a location where a junction might be needed. | |||
==Creating an Overpass== | |||
First, in this view, you can see that there is a junction between the interstate freeway and an overpass. This same is true of both sides of this interstate. | |||
[[Image:Bridging_1.png|540px]] | |||
Bridging works on only two segments at a time. Before you will be allowed to bridge, several properties of the segments to be bridged must be identical. The attributes which need to match are country, state (applicable countries only), city, and street name. Road type, directionality, locked and separating line settings do not matter. | |||
The first step is to [[Map_Editing_(new_Editor)#Selecting_Multiple_Segments|select two adjacent segments]] of what is to become the bridge or overpass. If segment properties match as described above, a small black bridge icon will appear above where the two segments meet, as shown below. | |||
[[Image:Bridging_2.png|540px]] | |||
''Click'' the bridge icon and three things happen: | |||
# The two selected segments are joined into a single segment | |||
# The Elevation of the new segment is set to 1 level higher than the higher Elevation of the two segments which were joined | |||
# The other two intersecting segments (in this case of the freeway), are also joined together into a single segment. | |||
There is now a new segment which was created by joining the two segments in the last step. In order to complete the overpass in this example, we need to repeat the process one more time. Different situations may require only one join, and some may require more than two. | |||
The two segments to select now are the "new" segment created from the first step, and the next segment to the right. | |||
[[Image:Bridging_3.png|540px]] | |||
When all the segments are bridged and joined together, you will have something similar to what is shown in the next screenshot. Notice that there are two geometry nodes where there used to be junctions. This is normal, and is exactly like what happens when you delete an unnecessary junction node in the middle of a segment. You can leave these nodes in place or delete them depending on the situation and whether they are necessary to keep the segment aligned with aerials or GPS points. | |||
[[Image:Bridging_4.png|540px]] | |||
Just before saving these changes, the last screenshot below here shows the two segments of freeway selected to show that they too no longer have a junction where they previously intersected with the overpass. | |||
[[Image:Bridging_5.png|540px]] | |||
[[Manual de Edición]] | |||
Revisión del 13:09 20 feb 2018
In unedited areas where the map is pretty raw from its import from public sources, all roads tend to be set to the same height with junctions between roads at different levels, such as overpasses and the freeways which pass under them. This can lead to incorrect and even dangerous navigation instructions. In these situations, it has happened that Waze would request that a driver turn while on a bridge to get to the interstate freeway below.
So that the Waze routing servers understand the reality that an overpass doesn't intersect with the freeway, or an urban bridge doesn't intersect the streets of a neighborhood below, a map editor needs to be able to separate the roadways in an efficient manner. This is where the Elevation value assigned to a segment and the Bridge function comes to the rescue.
How overlapping roads are defined in Waze
Waze has a value called Elevation which is assigned to every segment. By default, the Elevation of a segment is "Ground" (equivalent to zero). When two segments overlap, the value of Elevation for each segment must be different. This ensures that the Waze problem detection system doesn't flag the spot where two segments overlap as a location where a junction might be needed.
Creating an Overpass
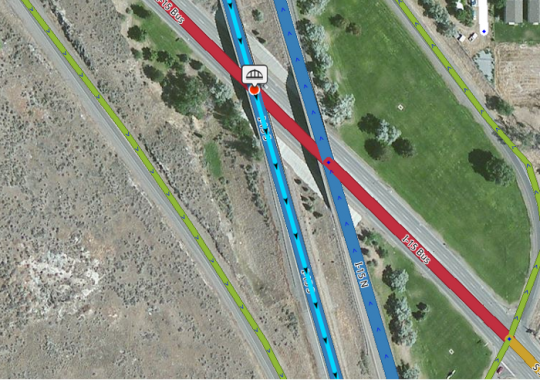
First, in this view, you can see that there is a junction between the interstate freeway and an overpass. This same is true of both sides of this interstate.
Bridging works on only two segments at a time. Before you will be allowed to bridge, several properties of the segments to be bridged must be identical. The attributes which need to match are country, state (applicable countries only), city, and street name. Road type, directionality, locked and separating line settings do not matter.
The first step is to select two adjacent segments of what is to become the bridge or overpass. If segment properties match as described above, a small black bridge icon will appear above where the two segments meet, as shown below.
Click the bridge icon and three things happen:
- The two selected segments are joined into a single segment
- The Elevation of the new segment is set to 1 level higher than the higher Elevation of the two segments which were joined
- The other two intersecting segments (in this case of the freeway), are also joined together into a single segment.
There is now a new segment which was created by joining the two segments in the last step. In order to complete the overpass in this example, we need to repeat the process one more time. Different situations may require only one join, and some may require more than two.
The two segments to select now are the "new" segment created from the first step, and the next segment to the right.
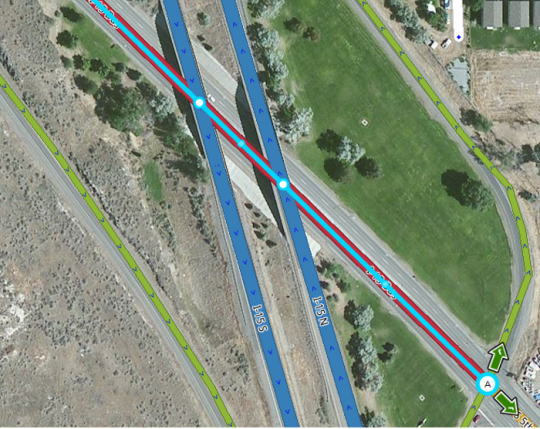
When all the segments are bridged and joined together, you will have something similar to what is shown in the next screenshot. Notice that there are two geometry nodes where there used to be junctions. This is normal, and is exactly like what happens when you delete an unnecessary junction node in the middle of a segment. You can leave these nodes in place or delete them depending on the situation and whether they are necessary to keep the segment aligned with aerials or GPS points.
Just before saving these changes, the last screenshot below here shows the two segments of freeway selected to show that they too no longer have a junction where they previously intersected with the overpass.


