m (1 revision imported) |
mNo edit summary |
||
| Line 20: | Line 20: | ||
<br /> | <br /> | ||
Information from <i>GIPOD</i> is used to provide information on closures in Flanders, <br /> | Information from <i>GIPOD</i> is used to provide information on closures in Flanders, <br /> | ||
[[File:Closures-example.png]] | [[File:Closures-example.png|400px]] | ||
{{Clear}} | {{Clear}} | ||
Revision as of 14:23, 2 May 2020
Closures
Real Time Closures (RTC) should be used when a road is temporarily unavailable. Users are notified of the closures in real-time, from the moment the closure is added routing through these segments is prevented. Active closures are made visible in the app and Live map with alerts and candy stripes on the closed segments.
Start date should only be in the next 365 days. End date is not limited. Duration is not limited
The script WME Closure Details can be used to view Closure details on closures outside the editable area. The script WME Advanced Closures handles recurrent and imported closures in the Waze Map Editor.


Users in the Waze app can mark an unexpected road closure they see while driving. Reliable requests become immediately active on the Waze map as a RTC and automatically shared, via the closures bot with editors in the relevant Slack-channels: #30-vl_closures, #30-fr_fermetures, #30-bl_closures-bxl.
The date an App closure is entered is used as startdate of the closure. App closures are almost always one-way closures.
To change the end date of an App closure: delete the App closure and create of a new one.
Closures can be set by editors with Level 3 and above and by the members of the Closure team.
For more information see the global page Real time closures.
Information from GIPOD is used to provide information on closures in Flanders,

Requests for closures
Requests for closures within one or two days are welcome in the Slack closure channels, others can be requested on our forums: Belgium forum closures.
Or use the Send to Slack script This script can be used by L1, L2 or bij higher levels for closure above their level.
Please enter your requests as follows:

- Level
- City and optionally Street name
- Starting date and time / End date and time
- Closure reason / description
- A permalink of the segment to close
- Source of the closure information
For defining special events for sets of closures see the Major Traffic Events page.
Traffic through closure

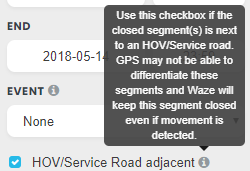
If a certain amount of traffic passes through a road with an active closure, this closure might disappear. This is checked every 10 minutes. If there is no traffic anymore the closure will return untill the closure end time. This feature is disabled if HOV/Service Road adjacent is checked.
Nodes Closed feature
How does the Closure on Nodes feature work?
1.Close two or more consecutive segments as usual
2. On the bottom of the closure screen, you will now also be able to see the Nodes Closed screen. The screen indicates whether the nodes are open or closed and allows you to change the state of the node by flipping the switch. When a node is closed, you’ll also see an indicator symbol on the map on the closed junction
Please note! When adding a closure for consecutive segments the default behavior will close all nodes with adjacent closed segments and open on the edges. This behavior is more intuitive as easier and will allow you to have a better overview of the closed nodes.
File:Nodes Closed Feature selection.png
File:Nodes Closed Feature.png
Some routing cases to be aware of:
1. When closing 2 consecutive segments please pay attention that the entire node is closed for traffic now. Even navigating from between two open streets over this node will not be possible.
2. If you close two-way segments in just one direction, you will not be able to close a node.
3. When opening a closure on only one of the consecutive segments, the node will still remain closed on the adjacent segment. You will still see the closed nodes icon on the map and traffic through this node from any direction will not be possible.
The same thing would happen if you were to flip the switch on just one of the consecutive segments. So make sure to pay extra attention to that while editing the map.
Last but not least, we have also created an amazing tutorial video for you. You can find it HERE!
