(Text added) |
No edit summary |
||
| (22 intermediate revisions by 4 users not shown) | |||
| Line 1: | Line 1: | ||
{{TopLine}} | {{TopLine}} | ||
<languages /><translate> | <languages /><translate> | ||
[[File: | |||
When you select a segment, you can set the turns by clicking the arrows at the junction(s) with other segments. | <!--T:1--> | ||
< | [[File:Junction-arrows-example.png|right]] | ||
When you select a segment, you can set the turns by clicking the arrows at the junction(s) with other segments. These arrows are also called [[Turn restriction|Turn restrictions]] or TR. | |||
<!--T:3--> | |||
In General: | In General: | ||
* A green arrow means Allowed | * A green arrow means Allowed | ||
* A yellow arrow | * A yellow arrow means it is [[Turn restriction|Partially Restricted]] (time or vehicle-type based) | ||
* A red arrow with the circle-slash icon means Restricted | * A red arrow with the circle-slash icon means Restricted | ||
Clicking an arrow toggles between Allowed and Restricted (or, between Partially and Fully Restricted). | Clicking an arrow toggles between Allowed and Restricted (or, between Partially and Fully Restricted). | ||
< | <!--T:4--> | ||
Each arrow must be set correctly for Waze to route correctly. Initial turn restrictions on roads that are imported by Waze, are set automatically by the Waze routing engine. At the moment these are called Soft turns. They are not yet confirmed manually by an editor and you can recognize them at the little question mark next to it. The soft turns can be altered by the routing engine, based on the driving activity. Manually set turns will never be altered by the routing engin. Unfortunately, both automatic and manually restricted turns are represented by red arrows and cannot be distinguished. Currently, when you use the option to enable all turns, it will not fully change the routing from automatic to manual setting, leaving possible so called RevCons. To clear these, select the junction with the mouse. Then, in the left menu pane, click the link to "Disallow all turns" and then "Allow all turns". Alternately you can use the keyboard shortcuts, by pressing the letter '''q''' to disallow all connections, followed by '''w''' to allow all connections. | |||
<!--T:5--> | |||
See the section [https://wazeopedia.waze.com/wiki/Global/Creating_and_editing_road_segments#Set_allowed_turns_.28connections.29 set allowed turns] in the global Wiki for more information.<br /> | |||
See the also global page on [https://wazeopedia.waze.com/wiki/Global/Soft_and_hard_turns Soft and hard turns]. | |||
<!--T:6--> | |||
Keyboard Shortcuts for junction arrowsː | Keyboard Shortcuts for junction arrowsː | ||
:Press | :Press {{key press|S}} to separate overlapping arrows. | ||
:Press | :Press {{key press|A}} to make arrows transparent or opaque, so you can see beneath them or click items under them | ||
:Press | :Press {{key press|Q}} to disallow all turns | ||
:Press | :Press {{key press|W}} to allow all turns | ||
:Press | :Press {{key press|⇧ Shift+z}} to toggle between seeing the turns for one segement, or seeing all restricted turns (red arrows) for all junctions in your screen. Don't forget to toggle back if actually setting the junction arrows on a segment. | ||
===Turn Instruction Overrides=== <!--T:2--> | |||
[[File:Junction-arrows-menu.png|right]] | |||
Turn Instruction Overrides (TIO) is a feature in the [[Waze Map Editor|WME]] which allows editors to manually set a turn arrow to give a non-default text and [[Text to speak|verbal instruction]] to the driver making that turn through a junction. | |||
<!--T:7--> | |||
<small>Note: A [https://wazeopedia.waze.com/wiki/Global/Junction_Style_Guide/Intersections#Steep_angles_with_exits_and_keep_right_or_left micro-dogleg] (mDL), was a technique used for altering the angle Waze sees at a junction, which affects turn instructions. The TIO replaces the mDL technique as the standard way for forcing turn instructions..</small> | |||
{{Clear}} | |||
===Enhanced Turn Instruction Overrides (TIO)=== | |||
explained in a [[enhanced TIO|separate page]] | |||
</translate> | </translate> | ||
__NOTOC__ | __NOTOC__ | ||
{{Bottomline}} | {{Bottomline}} | ||
Latest revision as of 09:49, 7 September 2021


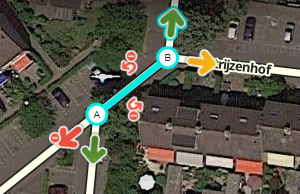
When you select a segment, you can set the turns by clicking the arrows at the junction(s) with other segments. These arrows are also called Turn restrictions or TR.
In General:
- A green arrow means Allowed
- A yellow arrow means it is Partially Restricted (time or vehicle-type based)
- A red arrow with the circle-slash icon means Restricted
Clicking an arrow toggles between Allowed and Restricted (or, between Partially and Fully Restricted).
Each arrow must be set correctly for Waze to route correctly. Initial turn restrictions on roads that are imported by Waze, are set automatically by the Waze routing engine. At the moment these are called Soft turns. They are not yet confirmed manually by an editor and you can recognize them at the little question mark next to it. The soft turns can be altered by the routing engine, based on the driving activity. Manually set turns will never be altered by the routing engin. Unfortunately, both automatic and manually restricted turns are represented by red arrows and cannot be distinguished. Currently, when you use the option to enable all turns, it will not fully change the routing from automatic to manual setting, leaving possible so called RevCons. To clear these, select the junction with the mouse. Then, in the left menu pane, click the link to "Disallow all turns" and then "Allow all turns". Alternately you can use the keyboard shortcuts, by pressing the letter q to disallow all connections, followed by w to allow all connections.
See the section set allowed turns in the global Wiki for more information.
See the also global page on Soft and hard turns.
Keyboard Shortcuts for junction arrowsː
- Press S to separate overlapping arrows.
- Press A to make arrows transparent or opaque, so you can see beneath them or click items under them
- Press Q to disallow all turns
- Press W to allow all turns
- Press ⇧ Shift+z to toggle between seeing the turns for one segement, or seeing all restricted turns (red arrows) for all junctions in your screen. Don't forget to toggle back if actually setting the junction arrows on a segment.
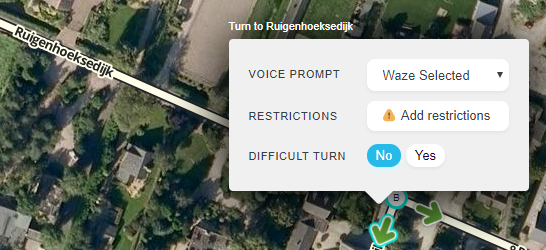
Turn Instruction Overrides

Turn Instruction Overrides (TIO) is a feature in the WME which allows editors to manually set a turn arrow to give a non-default text and verbal instruction to the driver making that turn through a junction.
Note: A micro-dogleg (mDL), was a technique used for altering the angle Waze sees at a junction, which affects turn instructions. The TIO replaces the mDL technique as the standard way for forcing turn instructions..
Enhanced Turn Instruction Overrides (TIO)
explained in a separate page